Feeds:
Posts
Comments

Archive for the ‘Healthy’ Category

Over the last few years I have gotten into the habit of making a pot of vegetarian chili for myself when I’m making traditional chili for Brandon. It’s not that I don’t enjoy beef-based chili but I try to be mindful of my meat intake and chili is a meal where I don’t miss it at all. I also find it extremely easy to make two separate batches because the base exactly the same, I just added the butternut squash in place of ground beef in my veggie variation.

I think I have finally perfected my chili recipe. This is my go-to and it always turns out delicious. I’m not much of a leftover fan but I’ve had this for dinner three times this week and I’m still craving more. It also freezes well for an easy dinner later down the road. This veggie chili is healthy and very satisfying. I like to top mine with cheese, plain Greek yogurt and sliced avocado along with a warm slice of cornbread or cheesy beer bread on the side!

Vegetarian Butternut Squash and Bean Chili
(A Bakin’ and Eggs Original)

Ingredients:

1 tablespoon olive oil
1 large onion, diced
1 green pepper, diced
1 jalapeno pepper, diced
2 cloves garlic, crushed and minced
2-3 tablespoons chili powder (to taste)
1 teaspoon cumin
1/2 teaspoon cayenne pepper
1 teaspoon kosher salt (or more to taste)
2 cups uncooked butternut squash, peeled and cubed (1-inch cubes)
1 (28-ounce) can petite diced tomatoes
1 (15-ounce) can black beans, drained and rinsed
1 (15-ounce) can dark red kidney beans, drained and rinsed
1 (15-ounce) can filled 3/4 with water
1 tablespoon cocoa powder

Directions:

Heat olive oil in a large pot over medium heat. Sauté onions, peppers and jalapeño until mixture become soft. Add garlic and sauté for another minute or two. Add spices and continue to sauté for another minute. Add squash, tomatoes, beans and water and bring to a simmer. I usually simmer covered on low heat for 60-90 minutes and then uncovered on low heat for 30-60, depending on how much time I have and how thick I want my chili. The longer you simmer it uncovered, the thicker it will get. Add the cocoa powder in 10-15 minutes before serving and stir well.

Yield: 8 servings

Read Full Post »

We’re trying to take advantage of the last few weeks of daylight savings time and mild temperatures by using the grill whenever possible for dinner. While Brandon is a year-round griller, it’s just more enjoyable to be out there in daylight and not shivering!

We’re always looking for ways to mix it up on the grill so we’re not always preparing the same grilled chicken, fish, steak, veggies, etc. Luckily, we have some great resources for inspiration and while flipping through The Cook’s Illustrated Guide to Grilling and Barbecue, I came across this recipe for Tandoori-Style Chicken Breasts. I really enjoy ethnic foods and I was especially excited for the opportunity to use the turmeric and coriander that are usually pushed to the back of the spice cabinet.

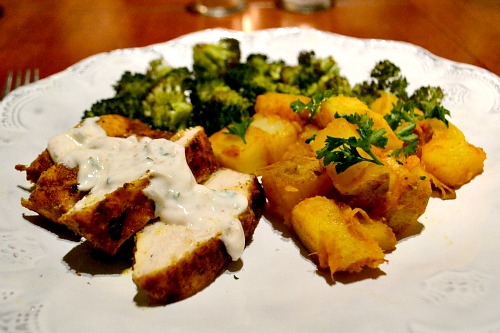
This chicken features a thick coating of a very flavorful spice rub. The tandoori effect is achieved by getting the grill really hot and starting the chicken on high heat before moving it to a cooler side of the grill. The yogurt sauce is the perfect finish and a nice contrast to the chicken. I served the chicken with Indian-Style Potatoes from Epicurious and roasted broccoli.

Tandoori-Style Grilled Chicken Breasts with Yogurt Sauce
(Recipe adapted from The Cook’s Illustrated Guide to Grilling and Barbecue)

Ingredients:

FOR THE YOGURT SAUCE
1 cup plain, nonfat Greek yogurt
2 tablespoons chopped fresh cilantro or parsley (if you’re a cilantro hater like my husband!)
1 garlic clove, minced (I briefly sauteed ours before adding it because I cannot do raw garlic)
Salt and cayenne pepper, to taste

FOR THE CHICKEN
1 teaspoon fresh ginger, peeled and minced
1 tablespoon ground coriander
1 1/2 teaspoons ground cumin
1 teaspoon ground turmeric
1/2 teaspoon ground cinnamon
Olive oil
4 boneless, skinless chicken breasts

Directions:

FOR THE YOGURT SAUCE
Whisk together all ingredients and season to taste with salt and cayenne. Place in fridge until ready to serve.

FOR THE CHICKEN
Prepare grill. If using gas, preheat by turning all burners to high and closing lid.

Mix together ginger, coriander, cumin, turmeric, cinnamon, 1/2 teaspoon of salt and 1/4 teaspoon of cayenne together in a small bowl. Rub chicken breasts with olive oil and then generously coat with spice mixture.

If using gas grill, leave one burner on high and turn others to medium low. Place chicken on hot part of the grill until well-browned, 2-3 minutes with the lid down. Move to the cooler side of the grill and continue to cook for another 10 mninutes. Turn and cook for 5 more minutes or until done. Internal temperature should read 160 degrees.

Note that we cooked this on the Big Green Egg and used a similar technique to the above by moving chicken to a cooler part of the grill after the first few minutes and cooking with lid down.

Let chicken rest for 5 minutes and then slice. Serve with yogurt sauce.

Yield: 4 servings

Read Full Post »

There are a few foods that are dinner staples in our house. We can’t seem to go a week or two without having them. Pizza, pasta and Mexican are three of the things you’ll find us eating frequently. (And coincidentally all feature carbs and/or cheese!)

We decided on pasta last night but wanted to try a new recipe. Typing “pasta” into the search box on Epicurious yields overwhelming results so in order to focus us a bit more, I gave Brandon The Gourmet Cookbook to browse through. He came up with a Penne with Arugula and Prosciutto that sounded great and featured a 20 minute start to finish time. This was perfect since we weren’t able to start on dinner until after 8 p.m.

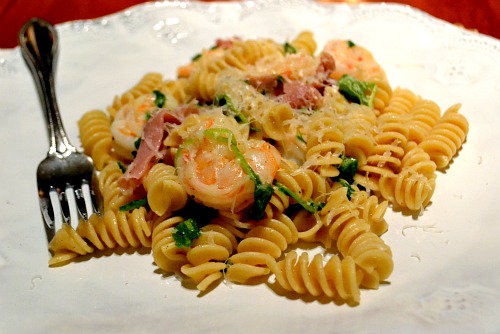
We made a few modifications to the original recipe. The biggest was the addition of shrimp which we both agreed really took the dish up a notch. Overall, this is a very simple recipe but each element plays a big part in the flavor, especially the arugula. Don’t skip it.

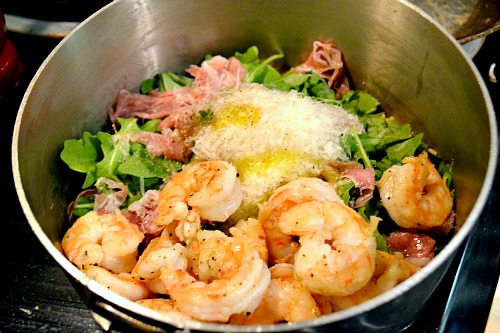
While the pasta was boiling, I sauteed the shrimp in olive oil with a little bit of a lemon pepper rub (Dizzy Pig Shakin’ the Tree). Once the pasta and shrimp were done, I drained the pasta and dumped all the ingredients into the pot with the pasta. After a stir and a generous crank of salt and pepper it was time to eat.

I served this  dish with a hunk of bread and olive oil dipping sauce. At one point I said, “Mmm…I love carbs.” aloud. We’re happy to have another pasta dish worth repeating (over and over again) in our repertoire!

Pasta with Shrimp, Arugula and Prosciutto
(Recipe adapted from The Gourmet Cookbook)

Ingredients:

1/2 pound pasta (half box) pasta, penne, corkscrew, etc.
1/2 pound shrimp, peeled and deveined
Seasoning of your choice for the shrimp (salt and pepper, lemon pepper, etc)
1/4 pound thinly sliced proscuitto, chopped
3/4 to 1 pound arugula, stems removed, chopped roughly (I used about 1/2 of a clamshell container)
1/2 cup finely grated parmigiano-reggiano
3/4 teaspoon grated lemon zest
1 quarter lemon, squeezed
2-3 tablespoons olive oil
Salt and pepper, to taste

Directions:

Cook pasta in a large pot of boiling salted water according to package directions. Reserve 1/2 cup cooking water and drain pasta.

While pasta is cooking, sautee shrimp over medium high heat with olive oil and seasoning of your choice. This should take about 3-4 minutes, total.

Return pasta to pot and toss with prosciutto, shrimp, arugula, cheese, lemon zest, lemon juice and salt and pepper to taste. Add some of the pasta water if it seems dry.

Yield: 2-3 servings

Read Full Post »

I love everything about summer dinners. Eating outdoors, using herbs from the garden, farmer’s market veggies and grilling. I enjoy entertaining during the summer. Everything is simple but fresh and very relaxed. We had friends over for dinner last weekend and I was able to spend the evening chatting rather than rushing around in the kitchen. The appetizer and side dish were made a head of time and the main and vegetable were done on the grill. It doesn’t get better than that!

While looking for side dishes that could be prepared ahead of time, I came across this Mediterranean Lentil and Couscous Salad. First, I have a serious fondness for anything that involves Mediterranean flavors and liked that that base of the salad was lentils and couscous. The inclusion of tomatoes, feta, arugula and fresh herbs really made this stand out. Second, I have an appreciation for recipes from Gourmet and usually find them to be winners.

I let the salad sit overnight to really let the flavors develop. It was a hit with our guests and the perfect side for a summer cookout. I enjoyed the leftovers for lunch the next few days!

Mediterranean Lentil and Couscous Salad
(Recipe source Gourmet magazine)

Ingredients:

1 cup French green or brown lentils
3 tablespoons white wine vinegar
1 1/4 cups water
1 cup couscous (I used whole wheat)
1/2 teaspoons salt
1/4 cup extra virgin olive oil
1 large garlic clove, minced and mashed to a paste with 1/4 teaspoon salt
1/2 cup fresh mint leaves, chopped
1 bunch arugula, stems discarded and leaves washed well, spun dry and chopped
2 cups cherry or grape tomatoes, halved
1/2 cup kalamata olives, pitted and chopped
1 cup crumbled feta
1/4 cup fresh basil, julienned

Directions:

Place lentils in a small saucepan and cover with 2 inches of water. Bring to a simmer and cook for 15-20 minutes or until lentils are tender but not falling apart. Drain and transfer to a bowl. Stir in one tablespoon vinegar and salt and pepper to taste. Cool lentils completely.

In a saucepan, bring water to a boil and add couscous and salt. Remove from heat and let couscous stand, covered, 5 minutes. Fluff couscous with a fork and transfer to a large bowl. Stir in 1 tablespoon oil and cool completely.

In a small bowl, whisk together garlic paste, remaining 2 tablespoons vinegar, remaining 3 tablespoons oil and salt and pepper to taste. Stir lentils and dressing into couscous. Chill salad, covered, at least 3 hours and up to 24.

Just before serving, stir in remaining ingredients, top with basil and season with salt and pepper. At this time I also added another drizzle of olive oil and a splash of vinegar but that’s totally optional.

Yield: 8 servings

Read Full Post »

Before I even get started on the recipe portion of this post, let’s talk about the current status of Bakin’ and Eggs. I am the first to admit that my posts have been few and far between. My schedule has been so insanely busy lately that I just haven’t had time to get in the kitchen and cook new recipes to blog about. We’ve been turning to a lot of old favorites and quick meals that while healthy and delicious, aren’t really blog-worthy. Perhaps the most sad of all is how little time I have had to bake lately. I really miss it. What time I do have, I’ve been putting towards updating my healthy living blog, Peanut Butter Runner.

There is a light at the end of the tunnel though. If you’ll just stick with me, I promise that I will resume to posting 3-5 recipes per week again soon. I am so ready to get back in the kitchen.

Now, on to the dip. I’m not the best when it comes to appetizer ideas. Give me a cheese plate and I’m a happy girl. We had friends over for dinner last night and I wanted to serve an easy, healthy, make-ahead appetizer. I thought of making hummus but while I still love to eat it, I’m a little over serving it to guests. I found this recipe for White Bean Dip from Giada and thought that it sounded like a great alternative to hummus.

The dip was so super simple to make and ready in under five minutes. It’s just a puree of white beans, parsley, lemon juice, olive oil, garlic and salt and pepper. If you wanted to mix it up, I think that it would also be great with basil instead of parsley. I served it with mixed veggies and pita chips. It was a perfect make-ahead summer appetizer!

White Bean Dip
(Recipe source Giada de Laurentiis)

Ingredients:
1 (15-ounce) can cannellini beans, drained and rinsed
1-2 garlic cloves (depending on how much punch you want to pack!), peeled and crushed
2 tablespoons fresh lemon juice
1/3 cup olive oil
1/4 cup (loosely packed) fresh Italian parsley leaves
Salt and freshly ground black pepper, to taste

Directions:
Place the beans, garlic, lemon juice, olive oil and parsley in a food processor or blender. Pulse or blend until the mixture is pretty smooth but still has some texture. Season with salt and pepper, to taste. Transfer to a small bowl and garnish with fresh herbs.

Yield: 6 servings


Read Full Post »

Herbs de Provence is one of my favorite spices but I don’t find many opportunities to use it. I ran across this recipe for Herb-Rubbed Chicken with Creamy Orzo on Annie’s Eats a few years ago and have been making variations of it ever since.

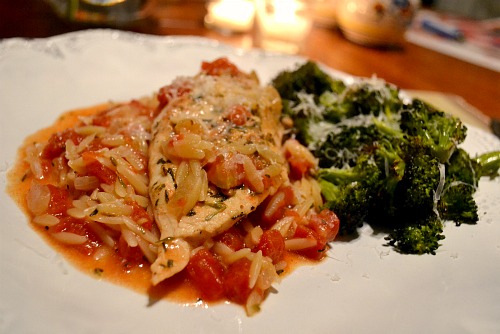
This is a simple dish to prepare because the chicken and orzo cook in the same pan. The original recipe includes broccoli in the pan with the chicken and orzo but I find that I prefer it roasted on the side. If you feel inclined to make it a one-pan dinner, throw the broccoli in there! (Side note, if you haven’t tried roasted broccoli yet, you must. It’s life changing.)

I really like recipes where chicken is braised in liquid. It’s a fool-proof, forgiving method for getting juicy, perfectly cooked chicken. The original recipe includes heavy cream but think all the other flavors are so great that I don’t need more than just a sprinkle of parmesan at the end.

Herbs de Provence Chicken with Orzo
(Recipe inspired by Annie’s Eats)

Ingredients:

2-3 chicken breasts
2 teaspoons herbs de provence
2 tablespoons olive oil
1/2 onion diced
1 large garlic clove, minced
1 can petite diced tomatoes, drained
1/2 cup orzo
1 cup chicken stock
Freshly grated Parmesan
Salt and pepper, to taste

Directions:

Season chicken with salt, pepper and herbs de provence. Set aside.

Preheat a large sautee pan (with a lid) over medium heat. Add olive oil and heat until shimmering. Add onion and cook for 3-4 minutes, stirring frequently. Add garlic and cook for another minute. Add chicken and let cook for about 5 minutes until browned on one side. Remove chicken from pan and add orzo, tomatoes and chicken broth. Stir and return chicken to pan, browned side up. Cover and let cook over medium-low heat for 15-20 minutes or until orzo is tender and internal temperature of chicken reads 160 degrees.

Sprinkle with Parmesan and serve.

Yield: 2-3 servings

Read Full Post »

I recently received the Canyon Ranch: Nourish cookbook from one of the readers of my healthy living blog. It is a beautiful cookbook full of delicious and healthy recipes. Brandon and I have both skimmed through the book and I’m pretty sure that we want to make every single thing in it!

I was feeling a chicken dish for dinner tonight and this recipe for Rustic Chicken sounded perfect given the blast of winter weather that we’re experiencing. Last week it was 80 degrees, this weekend it is 40 and raining…go figure. I am ready for spring to be here to stay!

This Rustic Chicken is simple and comforting but still elegant and flavorful with the addition of fresh herbs and a nice mixture of vegetables. I made a some changes to the original recipe, including adding carrots and parsley and subbing oregano for the sage. Next time I will use chicken cutlets rather than full breasts because I think they will absorb more flavor and we found we didn’t need a whole breast with all the other elements of the dish.

One Year Ago: Baby Greens with Warm Goat Cheese
Two Years Ago: Simple Broiled Mahi

Rustic Chicken
(Recipe adapted from Canyon Ranch: Nourished)

Ingredients:

3 tablespoons extra virgin olive oil, divided
1/4 cup shallots, sliced thinly
1 cup seasonal wild mushrooms, sliced (I used white and baby portobello)
1 1/2 cups frozen pearl onions
1 cup baby carrots
2 cups chicken stock
1/4 teaspoon fresh rosemary, chopped
1/4 teaspoon fresh oregano, chopped
1 teaspoon sea salt
1/4 teaspoon freshly ground black pepper
4 cups cooked pasta
1/4 teaspoon sea salt
1/4 teaspoon freshly ground black pepper
4 4-ounce boneless, skinless chicken breasts

For garnish: grated Parmesan cheese and chopped parsley

Directions:

Season chicken breasts generously with salt and pepper. In a large sauté pan, over medium heat, heat one tablespoon of oil. Sauté chicken breasts for 5-6 minutes per side or until browned and internal temperature reads 160 degrees. Remove from heat and cover loosely to keep warm.

Add remainder of oil to pan and saute shallots, mushrooms, onions and carrots for 8-10 minutes, or until shallots are translucent and mushrooms are soft. Add chicken stock, deglaze pan and reduce liquid by half.  Add rosemary and oregano and season with salt and pepper. Add pasta and toss together until well combined.

Evenly divide the pasta mixture into 4 bowls.  Top each serving with a chicken breast and sprinkle with grated cheese and parsley.

Yield: 4 servings

Read Full Post »

If you’ve been reading for a while then you might be familiar with my tendency to create a recipe including things like feta, spinach, sundried tomatoes and kalamata olives and call it Greek. Case in point – Greek Pasta, Greek Chicken Breasts and Greek Inspired Flounder. Actually, there are 11 recipes in my “Greek” category…right up there with the 12 in the “Italian” category. We just love foods with Mediterranean flavors!

Brandon and I were enjoying happy hour at our local brewery last night and brainstorming ideas for dinner. I remembered seeing feta and spinach turkey burgers on Jenna’s blog this week and I mentioned making an amped-up version of those. Brandon is always up for a good burger so he happily went along with the plan.

We prefer ground chicken over turkey so we started with that as our base. I pretty much went through the fridge and pantry and added in anything that I thought went with my Greek chicken burger theme. We ended up mixing in sundried tomatoes, kalamata olives, spinach, feta, parsley and oregano. I made a spin on tzatziki sauce to accompany the burgers.

These “on the fly” burgers totally ended up exceeding our expectations. After all the mix-ins, this was definitely not your average boring chicken burger. They were so easy to make and full of flavor.  I cooked them inside in a skillet but I’m sure they would be great grilled too.

One Year Ago: Mini Quiche (and dinner at Top Chef Kevin Gillespie’s restaurant!)
Two Years Ago: Lady Strawberry Cake

Greek Chicken Burgers
(Recipe inspired by Eat, Live, Run)

Ingredients:

FOR THE BURGERS
1 pound ground chicken
1 egg, slightly beaten
1 cup baby spinach, chopped
1/4 cup sundried tomatoes, chopped
1/4 cup kalamata olives, chopped
1/2 cup feta cheese, crumbled
1/2 teaspoon dried parsley (or 1 -2 tablespoons fresh)
1/2 teaspoon dried oregano (or 1 tablespoon fresh)
1 teaspoon kosher salt
A few cranks of freshly ground pepper

FOR THE SAUCE
1/4 cup plain Greek yogurt
2 tablespoons mayonnaise
1 teaspoon olive oil
Squeeze of lemon juice (maybe 1 teaspoon)
1/2 teaspoon dried parsley (or 1 tablespoon fresh)
Salt, to taste

Directions:

Whisk together ingredients for the sauce. Set aside.

In a large bowl, combine all of the burger ingredients and mix together (it’s easiest to use your hands here). Form into four patties. The mixture will feel pretty wet and like it’s going to fall apart but it will firm as it cooks.

Heat a large non-stick skillet over medium-high heat. Add a little oil and burgers. Cook about 6-8 minutes per side or until internal temperature reads at least 160 degrees in the thickest part of the burger.

Serve on toasted, buttered buns with sauce, lettuce and tomato. Top with extra feta if desired.

Read Full Post »

Meal planning can sometimes be tricky in our house due to my desire to reduce the amount of meat (including seafood) that I eat and my husband’s wish to have meat with most of our meals. Luckily, we’ve come to a compromise where I tend to avoid meat at breakfast and lunch and only have it with dinner two to three times per week. While Brandon still loves bacon breakfasts, turkey sandwiches at lunch and a steak for dinner, he is very willing to also have a couple of meatless dinners every week.

I find that it’s fun to experiment with ethnic dishes for our meatless mains. It seems like there are endless options ranging from curries to stir fries to pastas and much, much more. I recently got the idea in my head to make sesame ginger maple tofu and was pleased to discover a similar recipe on Eating Well. I loved that the sauce also included tahini.

This dish was so easy! Everything is roasted together in the oven with the sauce being drizzled over the tofu and vegetables towards the end of cooking. I served it over soba noodles.

I made a few alterations to the recipe by adding fresh ginger, doubling the sauce and including carrots and green pepper with the veggies. The sauce was so flavorful and really soaked into the tofu and veggie mixture. I think that you could substitute a variety of vegetables in this depending on your preferences and what you have on hand. Also, I think that this sauce would be great with shrimp.

The leftovers were just as good the next day. I served them over a bed of spinach with brown rice and a generous squirt of Siracha.

This is a healthy and delicious vegetarian dish that should be added to your meatless main rotation!

One Year Ago: Chocolate Cream Pie
Two Years Ago: Alton Brown’s “The Chewy” Chocolate Chip Cookies

Sesame Ginger Maple Tofu
(Recipe adapted from Eating Well)

Ingredients:

1 (14-ounce) block extra-firm water-packed tofu, rinsed, patted dry and cut into 1-inch cubes
1 medium onion, sliced
2 teaspoons canola oil
2 teaspoons toasted sesame oil
1/4 teaspoon salt
1/4 teaspoon freshly ground pepper
2 tablespoons tahini
2 tablespoons reduced-sodium soy sauce
2 teaspoons pure maple syrup
2 teaspoons cider vinegar
1 tablespoon fresh ginger, finely minced
3 cups sugar snap peas, trimmed
2-3 carrots, cut into one inch slices
1 green pepper, cut into thin slices
1 tablespoon sesame seeds
Soba noodles, rice noodles or brown rice, for serving

Directions:

Preheat oven to 425 degrees. Prepare a baking sheet by lining with foil (for easy cleanup) and spray with nonstick cooking spray.

Place tofu and veggies on a baking sheet and toss with oils, salt and pepper. Roast for about 20 minutes, shaking the pan from time to time. Drizzle all over with the sesame ginger maple sauce and continue roasting for another five minutes. Serve over soba noodles, rice noodles or brown rice.

Yield: 4 servings

Read Full Post »

In general, I don’t love soup for dinner. I usually find myself wanting more and struggling with what to pair it with to make it a meal. Don’t get me wrong though, I love heartier things like chili and chicken and dumplings so I was pleased to find that this Chicken Tortilla Soup was more similar to chili than soup. It was filling, comforting and relatively healthy!

My favorite part about the soup was how easy it was to put together. I had to work late last night and didn’t get home until 8 p.m. I quickly diced, chopped, sauteed and dumped and the soup was cooking away in just 15 minutes. I let it simmer for about 20 minutes before serving it but this is flexible. You could easily leave this to simmer for longer if you want to develop the flavors even more.

This recipe is a great use of leftover chicken and most of the ingredients are pantry friendly. It also freezes nicely and the leftovers taste even better!

One Year Ago: Pear and Cranberry Cake
Two Years Ago: Sushi

Chicken Tortilla Soup
(Recipe adapted from All Recipes)

Ingredients:

1 tablespoon olive oil
1 onion, diced
1 jalapeno pepper, minced
2-3 cloves garlic, minced
1 (4-ounce) can diced green chilies
1 tablespoon chili powder
1 teaspoon oregano
1 (28-ounce) can crushed tomatoes
1 1/2 cups water
1 1/2 cups chicken broth
1 (10-ounce) can of corn or 2 ears, cut off the cobb
1 (15-ounce) can black beans, rinsed
2-3 cups cooked shredded chicken
Salt and pepper, to taste
Toppings: cilantro, sour cream, shredded cheese, hot sauce, tortilla chips, diced avocado

Directions:

In a large pot or Dutch oven, heat olive oil over medium heat. Add onion and jalapeno and sautee for about 5 minutes until softened. Add garlic and green chilies and cook for another minute or two. Add chili powder and oregano and cook for another minute, stirring constantly. Add tomatoes, water, chicken stock, black beans, corn and chicken and bring to a simmer. Cover and let cook for 20 minutes, stirring frequently. Season with salt and pepper and serve with toppings.

Read Full Post »

Older Posts »