Feeds:
Posts
Comments

Archive for the ‘Big Green Egg’ Category

We’re trying to take advantage of the last few weeks of daylight savings time and mild temperatures by using the grill whenever possible for dinner. While Brandon is a year-round griller, it’s just more enjoyable to be out there in daylight and not shivering!

We’re always looking for ways to mix it up on the grill so we’re not always preparing the same grilled chicken, fish, steak, veggies, etc. Luckily, we have some great resources for inspiration and while flipping through The Cook’s Illustrated Guide to Grilling and Barbecue, I came across this recipe for Tandoori-Style Chicken Breasts. I really enjoy ethnic foods and I was especially excited for the opportunity to use the turmeric and coriander that are usually pushed to the back of the spice cabinet.

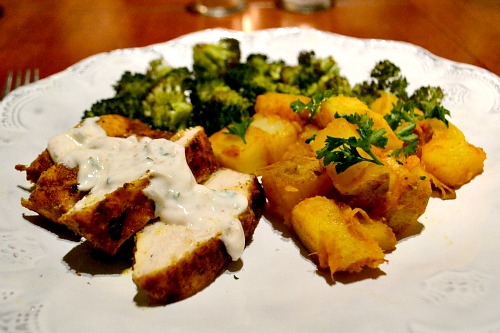
This chicken features a thick coating of a very flavorful spice rub. The tandoori effect is achieved by getting the grill really hot and starting the chicken on high heat before moving it to a cooler side of the grill. The yogurt sauce is the perfect finish and a nice contrast to the chicken. I served the chicken with Indian-Style Potatoes from Epicurious and roasted broccoli.

Tandoori-Style Grilled Chicken Breasts with Yogurt Sauce
(Recipe adapted from The Cook’s Illustrated Guide to Grilling and Barbecue)

Ingredients:

FOR THE YOGURT SAUCE
1 cup plain, nonfat Greek yogurt
2 tablespoons chopped fresh cilantro or parsley (if you’re a cilantro hater like my husband!)
1 garlic clove, minced (I briefly sauteed ours before adding it because I cannot do raw garlic)
Salt and cayenne pepper, to taste

FOR THE CHICKEN
1 teaspoon fresh ginger, peeled and minced
1 tablespoon ground coriander
1 1/2 teaspoons ground cumin
1 teaspoon ground turmeric
1/2 teaspoon ground cinnamon
Olive oil
4 boneless, skinless chicken breasts

Directions:

FOR THE YOGURT SAUCE
Whisk together all ingredients and season to taste with salt and cayenne. Place in fridge until ready to serve.

FOR THE CHICKEN
Prepare grill. If using gas, preheat by turning all burners to high and closing lid.

Mix together ginger, coriander, cumin, turmeric, cinnamon, 1/2 teaspoon of salt and 1/4 teaspoon of cayenne together in a small bowl. Rub chicken breasts with olive oil and then generously coat with spice mixture.

If using gas grill, leave one burner on high and turn others to medium low. Place chicken on hot part of the grill until well-browned, 2-3 minutes with the lid down. Move to the cooler side of the grill and continue to cook for another 10 mninutes. Turn and cook for 5 more minutes or until done. Internal temperature should read 160 degrees.

Note that we cooked this on the Big Green Egg and used a similar technique to the above by moving chicken to a cooler part of the grill after the first few minutes and cooking with lid down.

Let chicken rest for 5 minutes and then slice. Serve with yogurt sauce.

Yield: 4 servings
Read Full Post »

We first tried these tacos a couple years ago after Brandon got his Big Green Egg and was looking for fun recipes for his grill. We couldn’t get over how flavorful and different the tacos were. The recipe came from The Barebcue Bible by Steven Raichlen. We have a couple of Steve’s books and they are fabulous for getting inspiration for different recipes for the grill. Also, his recipes provide very specific grilling instructions so they’re perfect for both the experienced griller who’s looking for different recipes and for the novice griller who’s learning that grilling is more than flip, flip, poke.

According to Steven, this dish is commonly found in Mexico and traditionally served with guacamole, spicy salsa and corn tortillas. The adobo sacue has a nice gentle heat but is not overwhelming. It’s such a nice twist on your traditional taco.

Switch it up and try something new on the grill this summer!

One Year Ago: Cajun Tilapia with Polenta and Peppers

Adobo Grilled Pork Tacos
(Recipe source The Barbecue Bible)

Ingredients:

6 guajillo chiles or 1/4 cup pure chile powder (the guajilo chiles are dried and were available in my local store)
1/2 cup distilled white vinegar
4 cloves garlic
1 teaspoon salt
1 teaspoon freshly ground black pepper
1 teaspoon dried oregano
1/2 teaspoon cinnamon
1/4 teaspoon ground cloves
1 (1 1/2 pound) pork loin or tenderloin

For serving: corn tortillas, guacamole and salsa

Directions:

If using the chiles, tear open and remove the veins and seeds. Soak in the vinegar for 30 minutes, or until soft.

Combine the chiles (or chile powder), vinegar, garlic, salt, pepper, oregano, cinnamon and cloves in a blender and process into a smooth, wet paste.

Cut the pork loin into four broad, thin (1/4 inch thick) sheets (butterflying them). Spread each piece of pork with adobo mixture and stack in a glass baking dish. Cover and let marinate in fridge, 4 to 6 hours.

Preheat grill to high. Oil grill grate, arrange slices of pork on hot grate and grill, turning with tongs, until browned and cooked through. This should take around 2-3 minutes per side. Internal temperature should be 145-15o when you pull it. Let pork rest for a few minutes before slicing.

Serve with tortillas, guacamole and salsa.

Yield: 4 servings

Read Full Post »

This recipe has been starred in my Google reader since October 3, 2009. Every time I scrolled through my starred recipes I would think, “oh that looks good, I need to make it soon.” And it finally made it on to the menu plan this week! Artichokes are one of my all-time favorite “special” vegetables and stuffing a burger with artichokes and cheese just sounded perfect.

The verdict? I am glad that I made these burgers nine months after originally staring them! They were an awesome change from traditional burgers. The original recipe used fontina but suggested subbing feta. I had a big block of feta in the fridge so I went with that. The feta was delicious!

The only negative about the burgers is that they were a little hard to work with. The turkey was difficult to shape – the mixture seemed really wet. Brandon was concerned about getting them on the grill but they ended up grilling nicely and firming up.

Overall, I would recommend these burgers to anyone looking for a twist on traditional burgers or looking for a lower fat (or red meatless) option. We might try the burgers with ground chicken next time!

One Year Ago: Strawberry (or Cherry) Muffins

Artichoke and Feta Stuffed Turkey Burgers
(Recipe adapted from Proceed with Caution, originally from Good Things Catered)

Ingredients:

1 pound lean ground turkey
1 tablespoon balsamic vinegar
1/4 medium sweet onion, finely diced
1 large garlic clove, minced
Salt and pepper, to taste
2 artichoke hearts, quartered
4 ounces crumbled feta
4 burger buns

Directions:

Mix together turkey, onion, balsamic, garlic, salt and pepper in a medium bowl. Form three or four patties (depending on the size of your buns and keeping in mind that the burgers will cook down a bit on the grill). Place patties on a plate and remove the top third of them. Create a small well and place an artichoke heart quarter and one ounce of feta in the well. Replace the meat you removed on top of the filling and seal the edges.

Heat grill to medium. Cook burgers about 8-10 minutes per side, or until a thermometer registers at least 160 degrees. Be careful placing the burgers on the grill and try not to move them around much (so they keep their form).

Place on buns and serve.

Yield: 3 to 4 burgers

Read Full Post »

I have been all about Josie’s blog, Pink Parsley, lately. I think we have really similar cooking/eating styles and I’ve just gotten so much inspiration from her the last few months. I’m pretty sure that I have at least 10 recipes from her blog starred in my Google Reader right now. I’m having so much fun cooking things that are not from Gourmet even though I have made two recipes from The Gourmet Cookbook since 68 Days of Gourmet ended!

Our standby preparation for grilled chicken is simple – olive oil and a Dizzy Pig rub. I thought that this recipe would be a fun way to mix up our grilled chicken and use rosemary from my new herb garden (which I’m proud to say I’m keeping alive – I’m remembering to water the herbs and keeping the little plants happy!). I placed the chicken in the marinade before work and later that night Brandon grilled it on the Egg while I prepared goat cheese mashed potatoes and roasted broccoli. The only changes I made to the recipe were slightly increasing the rosemary in the marinade because I just love it so much and using chicken breasts instead of thighs. A simple and delicious dinner.

I will definitely be keeping this simple marinade in my repertoire!

Rosemary Grilled Chicken
(Recipe source Pink Parsley, originally adapted from Southern Living, September 2008)

Ingredients:

2 garlic cloves, minced
1 tablespoon extra virgin olive oil
2 tablespoons dijon mustard
2 tablespoons honey
1 teaspoon red wine vinegar
1 teaspoon salt
1 teaspoon chopped fresh rosemary (increase if you want more rosemary flavor!)
1 1/2 pounds boneless, skinless chicken thighs or breasts, trimmed of excess fat
1/2 lemon

Directions:

Combine the garlic, oil, mustard, vinegar, honey, salt and rosemary in a shallow dish or large ziploc bag.  Add chicken and turn to coat.  Marinate, chilled, for at least one hour or up to 24 hours.

Prepare grill and heat to about 350-375. Grill chicken breasts about 8 minutes per side or until an internal temperature of 160 has been reached.  Remove chicken from grill, cover with aluminum foil and allow to rest 10 minutes. Before serving, top with the juice from half of a lemon.

Yield: 4 servings

Read Full Post »

68 Days of Gourmet: Day 59 (final stretch!!!)

These Chile Crusted Tuna Tacos felt like a great choice for a warm spring night. They were a light and refreshing dinner paired with sangria and Black Bean and Quinoa Salad. Tuna is one of our favorite fish choices and I was eager to try it in fish tacos instead of our usual Asian preparations (like this and this).

Although the recipe required preparation of several different elements, it still felt relatively simple to prepare. I was able to take my time with each of the steps and enjoy dicing, simmering and sautéing. The end result was a tasty twist on fish tacos – sweet, spicy, crunchy. Yum!

I was disappointed that I was not able to use the jicama that the recipe called for. It was mushy and moldy at the store. 😦 I ended up making a game-time decision to sub purple cabbage for some crunch. It worked but next time I would definitely do the jicama.

If you’re a fish taco lover or looking for a warm weather spin on tacos, these are a great option!

One Year Ago: Tropical Carrot Cake

Chile Crusted Tuna Tacos
(Recipe source Gourmet, August 2003)

Ingredients:

FOR THE SAUCE
1 cup fresh orange juice
1 tablespoon minced canned chipotles in adobo (including sauce)
1 tablespoon distilled white vinegar

FOR THE TUNA
1 1/2 teaspoons ground coriander
1 1/2 teaspoons ground cumin
1 1/2 teaspoons chili powder
1 1/2 teaspoons cracked black pepper
1 1/2 teaspoons kosher salt
3/4 lb (1 1/2-inch-thick) sushi-grade tuna steak
2 tablespoons olive oil

TO FINISH
4 (9- to 10-inch) flour tortillas
1 cup matchstick (1/8-inch-thick) pieces of jicama (from 1 small jicama, peeled) (I subbed shredded cabbage)
1/4 cup coarsely chopped fresh cilantro (omitted – Brandon will not eat cilantro!!!)
2 tablespoons fresh lime juice
1 firm-ripe California avocado
1 cup loosely packed arugula, coarse stems discarded

Bring orange juice, chipotles and vinegar to a boil in a small heavy saucepan. Reduce heat and simmer, stirring occasionally, until reduced to a generous 1/3 cup, about 15 to 20 minutes. Remove from heat and cool.

Toss jicama with cilantro, lime juice, remaining tablespoon oil, and salt and pepper to taste in a small bowl. Refrigerate until ready to use.

While sauce cools, prepare charcoal or gas grill for cooking. If using a charcoal grill, open vents on bottom of grill, then light charcoal. Charcoal fire is medium-hot when you can hold your hand 5 inches above rack for 3 to 4 seconds. If using a gas grill, preheat burners on high, covered, 10 minutes, then reduce heat to moderately high.

Alternatively, you can sear tuna in a skillet over medium-high heat if you need to cook indoors.

While grill heats, stir together coriander, cumin, chili powder, black pepper and kosher salt in a shallow bowl. Brush tuna on all sides with olive oil and coat evenly with spice mixture.

Grill tuna on lightly oiled rack, uncovered, turning once, until seared on outside but still rare in center, about 2-3 minutes per side. Let tuna stand 10 minutes.

While tuna stands, heat tortillas on grill, turning over once, until warm, about 1 minute, and keep warm, wrapped in foil. Halve, pit and peel avocado and cut into 1/2-inch-thick slices.

Alternatively, sear tuna in pan for 2-3 minutes per side over medium heat and heat tortillas in microwave for 20-30 seconds.

Put a tortilla on each of 4 plates. Divide arugula, jicama mixture and avocado among tortillas, arranging evenly down center of each. Slice tuna 1/4 inch thick and divide among tacos. Drizzle orange chipotle sauce evenly over tuna and serve.

Yield: 4 servings

Read Full Post »

68 Days of Gourmet: Day 55

An awesome grilled pork tenderloin to celebrate the first 80+ degree day of the year! It’s been such a cold winter and our recent bout of Spring weather is energizing and refreshing. Brandon, Sullie and I went for a run after work today and then came home and got to work on this delicious dinner!

I will only buy pork tenderloin when it is on sale and lucky for us it was on special this week. I remembered seeing this recipe and thought it would be a great for Spring grilling. This pork would have been great grilled with the marinade alone but the addition of the jalapeno onion marmalade really took it over the top. It was so easy to have Brandon outside grilling the pork tenderloin and our favorite grilled sweet potatoes while I worked on the marmalade and green beans. Teamwork!

Quick update on the fitness front. First, workouts have been solid this week. I’ve taught BodyPump 3 out of the last 4 days (teaching the new release – BodyPump 73!) and also squeezed in yoga and some runs. Feeling strong but getting a little tired towards the end of the week. Legs are pretty dead and my back is really sore. Still hoping to fit in one more yoga practice tomorrow morning before hitting the road this weekend. We’re going to visit my grandmother to celebrate her birthday and Easter!

Hope to have some updates for you over the weekend. My dad and I will be in the kitchen together so you know that means some good things are coming!  Also, I’ll be baking this beautiful Lady Strawberry Cake for Mema’s birthday dinner! Yum!!! 😀

One Year Ago: Crescent Breakfast Casserole (one of the most popular recipes on my blog!)

Grilled Garlic Lime Pork Tenderloin with Jalapeno Onion marmalade
(Recipe adapted from Gourmet, September 1995)

Ingredients:

FOR THE MARINADE
3 large garlic cloves
1 tablespoon soy sauce
1 tablespoon fresh ginger root
1 teaspoons Dijon mustard
3 tablespoons fresh lime juice
1/4 cup olive oil
Cayenne to taste
1 pork tenderloin (about 1 pound), trimmed

FOR THE MARMALADE
1 large onion, cut into thin slices
3 tablespoons olive oil
2 fresh jalapeño chilies, seeded and minced
2 tablespoons honey
3 tablespoons red-wine vinegar
1/4 cup water

FOR THE MARINADE
Combine all ingredients in a food processor and pulse until smooth. Season to taste with salt and pepper. Combine pork and marinade in a large resealable plastic bag. Squeeze out excess air and marinate 12-48 hours.
FOR THE PORK
Preheat grill to medium-high heat. Remove pork from marinade and let excess drip off. Cook about 4 minutes per side (4 sides) until internal temperature reaches 145-150 degrees. Remove from heat and let rest for 5 minutes (resist the urge to cut in – let the temperature continue to rise and the juices redistribute).
FOR THE MARMALADE
While the pork is grilling, cook onions over medium heat in a large heavy skillet until softened, about 5 minutes. (I used cast iron – always do to caramelize onions!) Season with salt and pepper. Add jalapenos and cook for 1 minute. Add honey and cook another minute, stirring frequently. Add vinegar and simmer, stirring until almost all liquid is evaporated. Add water and simmer, stirring, until slightly thickened and onions are very tender, about 10 minutes. Season marmalade with salt and pepper.
Cut pork into slices and serve with marmalade.
Yield: 2-3 servings

Read Full Post »

68 Days of Gourmet: Day 11

One of my favorite things to do is stay in on Friday night and cook a nice dinner. I’m usually pretty tired from a week of working and enjoy hanging out at home, cooking and watching a movie. We save going out for Saturday nights. Brandon commonly requests steak for our Friday night dinners. He used to love filets but since getting into grilling his favorite now is bone-in ribeyes.

Filets were on sale at the grocery Friday so I decided have Brandon grill them and I’d make a nice sauce. We love sautéed mushrooms with grilled steaks so I decided this recipe for Filet Mgnon with Mushroom Sauce from Gourmet sounded perfect.

The combination of the bacon and mushrooms in this sauce was great. The bacon really added an extra element of depth to the sauce and the lemon brightened it up. It was very simple to put together and holds well if your steak isn’t ready yet. The sauce was a nice addition to the grilled filet. I served our steaks with steamed asparagus and roasted fingerling potatoes. A perfect dinner for two!

Filet Mignons with Mushroom Sauce
(Recipe source Gourmet, March 1995)

Ingredients:

1 slice bacon
1 small garlic clove, mashed to a paste
1 1/2 tablespoons unsalted butter
6 white mushrooms, sliced thin
2 tablespoons Cognac or other brandy
2 tablespoons water
2 teaspoons fresh lemon juice
1 teaspoon Worcestershire sauce
1 tablespoon fresh parsley, minced
Salt and pepper, to taste
2 filet mignons, about 1 inch thick

Directions:

Cook bacon over medium heat in a heavy 8-inch skillet (cast iron if available) until crisp. Transfer to a paper towel and pour off excess fat from the skillet. Crumble bacon and reserve.

Add 1 tablespoon of butter and garlic to skillet. Cook until butter is softened and then add mushrooms and salt and pepper, to taste. Cook for about 10 minutes, stirring frequently, until liquid from mushrooms begins to evaporate. Add brandy and boil until nearly evaporated. Stir in water, lemon juice and Worcestershire sauce and boil until sauce is thickened slightly. Transfer sauce to a small saucepan and stir in reserved bacon and parsley. Keep sauce warm.

Pat filets dry with paper towels and generously salt and pepper. If you’re cooking steaks in skillet, heat remaining 1/2 tablespoon butter over medium high heat and sauté filets for 4 minutes. Sear sides slightly and turn filets over. Sauté 3 to 3 1/2 minutes more for medium-rare meat. Internal temperature should be 125 degrees. Let steak rest for about 5 minutes before serving.

For the grill, preheat the grill to 400 degrees. Cook steaks for about 4-5 minutes per side, rotating half way through on each side if you want grill marks (a 45 degree turn). Pull steaks when they’ve reached 125 degrees for medium rare. Let rest 5 minutes to allow juices to redistribute.

Divide filets between 2 plates and spoon sauce over them.

Yield: 2 servings

And another filet suggestion…Bacon Wrapped Filet
https://bakinandeggs.wordpress.com/2009/04/08/bacon-wrapped-filet/

Read Full Post »

altonturkey

Two posts in one day? I can honestly say I never thought this would happen but this turkey is just too beautiful not to share with my readers while everyone is planning Thanksgiving menus. I can’t take any credit for this bird – it’s my dad’s practice turkey for Thanksgiving. He made this last weekend on the Big Green Egg using Alton Brown’s Good Eats Roast Turkey recipe. If you’re looking for a turkey recipe I think you should give Alton’s a try. I was shocked to see it has received 2,289 reviews and still has 5-stars. Pretty impressive! My dad was very pleased with how this turkey turned out and will be using this recipe on Thanksgiving day.

One of the benefits of cooking your turkey on the Egg is having your oven space available for all your sides and desserts. Also, the smoke flavor and crisp skin is delicious! If you don’t have an Egg, no worries. Alton’s recipe provides step-by-step instructions for the oven.

The only thing my dad did differently was let the turkey air-dry in the fridge for 12 hours before cooking. This dries the skin to help it become golden and crisp while cooking.

Can’t wait to try this turkey on Thanksgiving day!

Good Eats Roast Turkey on the Big Green Egg
(Recipe adapted from Alton Brown)
Printable Recipe: Good Eats Roast Turkey on the Big Green Egg

Cook Time:

BRINE
14-16 hours (1 hour per pound)

AIR CHILL
12 hours

COOK TIME
2 hours 30 min (max)

Ingredients:

1 (14-16  pound) fresh turkey

FOR THE BRINE
1 cup kosher salt
1/2 cup light brown sugar
1 gallon vegetable stock
1 tablespoon black peppercorns
1 1/2 teaspoons allspice berries (my dad substituted 1/2 teaspoon cinnamon)
1 1/2 teaspoons chopped candied ginger
1 gallon heavily iced water

FOR THE AROMATICS
1 red apple, sliced
1/2 onion, sliced
1 cinnamon stick
1 cup water
4 rosemary sprigs
6 sage leaves
Canola oil

Directions:

TO MAKE THE BRINE
Combine the vegetable stock, salt, brown sugar, peppercorns, allspice berries and candied ginger in a large stockpot over medium-high heat. Stir occasionally to dissolve solids and bring to a boil. Remove the brine from heat, cool to room temperature and refrigerate.

TO BRINE THE TURKEY
The day before you’re roasting your turkey, combine the brine, water and ice in the 5-gallon bucket. Place the turkey (with innards removed) breast side down in brine. If necessary, weigh down the bird to ensure it is fully immersed. Cover and refrigerate or set in cool area for one hour per pound. Turn the bird once halfway through brining if your turkey is not fully submersed.

After brining time is up, remove the bird from the brine, rinse and pat dry. Place in refrigerator and allow to air chill overnight, about 12 hours.

TO ROAST THE TURKEY
If using the Egg, set it up with a plate setter or pizza stone. Place a cast iron grate (feet side up) on top of that and finally you’ll place the turkey in a roasting pan on top of that (after Egg is preheated). Preheat the oven or Big Green Egg to 500 degrees.

Combine the apple, onion, cinnamon stick and 1 cup of water in a microwave safe dish and microwave on high for 5 minutes. Add steeped aromatics to the turkey’s cavity along with the rosemary and sage. Tuck the wings underneath the bird and coat the skin liberally with canola oil.

Roast the turkey in the Big Green Egg with lid down or on lowest level of the oven for 30 minutes. Insert a probe thermometer into thickest part of the breast and reduce the oven temperature to 350 degrees (or bring the grill temperature down). Set the thermometer alarm (if available) to 161 degrees and remove the turkey to rest when it reaches this temperature. (After 2 hours my dad’s turkey was 163 degrees in the breast and 171 degrees in the thigh).

Let the turkey rest, loosely covered with foil for at least 15 minutes before carving.

Read Full Post »

shrimptaco

First things first, let me apologize profusely for the quality of this picture. Unfortunately, dinner wasn’t ready until it was dark outside so I was forced to shoot these in the harsh, unflattering light of my kitchen. But these shrimp tacos were just too delicious not to share!

I have been craving shrimp tacos for the last couple weeks. I couldn’t really find a recipe that sounded perfect to me so I just kind of went for it. I decided to do grilled shrimp with a spicy jerk rub, shredded cabbage, salsa, cheese and this great Baja cream that I found on Epicurious. The combination turned out great. The flavors went together really well. The Baja cream balanced out the spiciness of the jerk grilled shrimp and the cabbage added just the right crisp to the tacos. And to top it off, they were pretty healthy!

I served these with black beans and rice (recipe to come on the blog soon!) and grilled corn. Perfect summer meal!

Grilled Shrimp Tacos
(A Bakin’ and Eggs Original)

Ingredients:

1/3 cup light mayonnaise
1/2 cup light sour cream
1 teaspoon lime zest
1-2 tablespoons freshly squeezed lime juice (to taste)
Pinch of salt
1 pound medium shrimp, peeled and deveined
Extra virgin olive oil
Jerk seasoning rub (recommended Dizzy Pig Jamaican Firewalk)
Skewers (metal or bamboo soaked in water)
Cooking spray
Taco sized flour tortillas
Your favorite salsa
Shredded cheese
Shredded cabbage

Directions:

Mix together mayonnaise, sour cream, lime zest, lime juice and salt for Baja cream. Refrigerate at least 30 minutes to let flavors develop.

Preheat grill to medium heat (around 400 degrees).

Place shrimp in a bowl and drizzle with olive oil. Toss to coat lightly. Generously shake Jerk rub over the shrimp and toss to coat. Place shrimp on skewers. Spray grill grate with cooking spray and place shrimp and grill. Cook for about 2 minutes per side or  until pink and no longer translucent.

Wrap tortillas in a paper towel and heat for about 45 seconds in the microwave. Place grilled shrimp (I did about 4 per taco) on tortillas and then top with cabbage, salsa, Baja cream and cheese.

Yield: 2-3 servings

Read Full Post »

freshfigbluepizza

I stopped by my in-law’s house today during my lunch break. Brandon was over there helping his mom cut some dead trees down to create extra sunlight for the garden she’s planning. So as he was doing back breaking labor, I was meandering around the yard and saw a fig tree I’d never noticed before – chock full of fresh, ready to pick figs. I left with a bag full of fresh figs and Brandon left sweaty and sore. Hey, fair trade for this super flavorful, delicious pizza we created tonight!

I came home and started looking for recipes to use my fresh figs. I saw tons of suggestions just to wrap them in prosciutto or stuff them with cheese. I decided to take those ideas and turn it into a pizza. One of our favorite grilled pizzas during the summer is this Gorgonzola, Walnut and Caramelized Onion Pizza from Gourmet. Using the preparation method from that recipe, I created this pizza. The flavors went together beautifully and it was a perfect light dish for this very hot summer day. I served it with a side of mixed greens.

Grilled Fig and Prosciutto Pizza
(Recipe inspired by Gourmet)

Ingredients:

1 ball pizza dough (homemade or store bought – we used Trader Joe’s) at room temperature
Extra virgin olive oil
2 ounces prosciutto
1/2 cup sliced fresh figs
1/2 cup caramelized onions
1 cup blue cheese, crumbled

Directions:

Preheat grill to medium. On a well-floured surface, stretch dough into about a 12 x 10 rectangle (we chose to divide our dough and make two smaller pizzas because they’re easier to handle on the grill).  Brush top with olive oil to lightly coat.

Create a platter and bring your dough and pizza toppings to the grill area. Oil grill rack and place dough olive oil side down on the grill (with no toppings on it at this point) and grill, covered, for 2-3 minutes or until golden brown on the bottom.

Carefully remove dough from grill and turn over (grill side up). Layer toppings starting with prosciutto, followed by onions, figs and cheese. Return to grill and grill covered for another 3 minutes, until underside is golden and cheese is melted.

Let cool before slicing into squares.

Yield: 2-3 servings

figpizzaongrill

Read Full Post »

Older Posts »