Feeds:
Posts
Comments

Archive for the ‘Tried and True’ Category

One of my favorite things that my grandmother cooked when I was growing up was meatloaf. It was a traditional beef-based meatloaf. She topped it with mushrooms and I loved to dip it in ketchup. Yep, it’s the most simple meals that stand out in my mind.

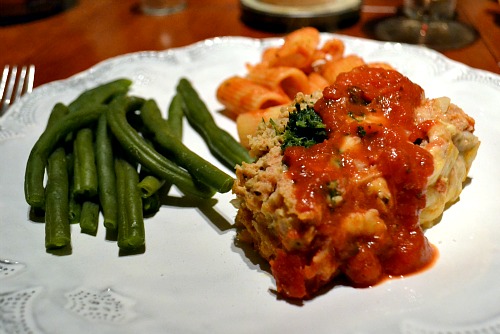
I don’t make meatloaf often but when I do it’s usually a variation that is far from what I used to eat at my grandmother’s table. I first made this chicken meatloaf stuffed with spinach and cheese a few years ago after spotting it on Pennies on a Platter. I’ve made a few changes to the original recipe and I think they’re worthy of sharing with you.

What I enjoy most about this dish is that the individual elements come together for a delicious flavor combination. The chicken mixture is flavored with herbs and garlic and then stuffed with cheese and spinach and topped with marinara sauce and cheese. It makes for a great spin on Italian night. I usually serve it with an extra drizzle or marinara, pasta and a green vegetable or salad. The leftovers reheat wonderfully.


Mozzarella and Spinach Stuffed Chicken Meatloaf
(Recipe adapted from Pennies on a Platter)

Ingredients:
1 pound ground chicken
1 cup marinara sauce, divided
1/2 cup bread crumbs
1 teaspoon Italian seasoning
1 tablespoon fresh parsley, diced
1/2 large onion, finely diced
2 garlic cloves, smashed and minced
2 eggs, lightly beaten
1/4 cup grated parmesan cheese
1/2 teaspoon fennel seed, crushed (optional)
1 (10 ounce) package frozen chopped spinach, thawed and drained (squeeze all the water out)
1 1/2 cups shredded mozzarella cheese, divided

Directions:

Preheat oven to 350 degrees. Line a 9-inch loaf pan with foil, shiny side down.

In a large bowl, combine chicken, 1/4 cup marinara sauce, bread crumbs, herbs, fennel, garlic, onion, eggs and parmesan cheese and mix well.

Press half of chicken mixture into loaf pan, creating a one-inch indentation down the center. Leave one-inch thickness on all sides. Mix together spinach and 3/4 cup mozzarella cheese and spoon into the indentation. Cover with remaining chicken mixture and seal edges.

Top with remaining 3/4 cup marinara sauce and 3/4 cup cheese and bake for 50-60 minutes, or until internal temperature reaches 160 degrees. Let stand for 10 minutes and then lift out of loaf pan using foil edges. Slice and serve with additional marinara sauce, if desired.

Yield: 6-8 servings

Read Full Post »


We enjoy ethnic food and love cooking it at home. I first made this Chicken Tikka Masala from Cook’s Illustrated a couple of years ago and was so impressed that I was able to make such a delicious Indian dish at home.

Although the recipe does have quite a few ingredients and multiple steps, it is fairly easy. Don’t be intimidated if you’ve never tried anything like this at home! The sauce and chicken are cooked separately and stirred together in the end. The chicken is dipped in yogurt and broiled which yields tender meat with nice charred spots. While the chicken cooks, the masala sauce simmers. The sauce has a nice, slow burning heat thanks to a serrano chili. If spice isn’t your thing, substitute a milder pepper or omit it all together.

The only substitution that I made to the original recipe was to sub the heavy cream in the sauce for plain yogurt. I thought that the plain yogurt would work well in this dish to add creaminess based on my success with this Curry and Yogurt Braised Chicken that we love. It turned out just as tasty as I hoped and the plain nonfat yogurt provided guilt-free creaminess.

I served the tikka masala over brown rice with naan on the side. Naan is a must for dipping into the delicious sauce. I usually make homemade naan but was pressed for time so I used Trader Joe’s naan. It was passable but Brandon and I both agreed that the homemade is much better.

One final note, this dish reheats well. It’s one of those things that has even more flavor the second time around. Whether you love Indian food or have never made it at home, this is an awesome recipe to try!

One Year Ago: Nutella Croissants
Two Years Ago: Maple Butter Pecan Ice Cream

Chicken Tikka Masala
(Recipe source Cook’s Illustrated)

Ingredients:

FOR THE CHICKEN
1/2 teaspoon ground cumin
1/2 teaspoon ground coriander
1/4 teaspoon cayenne pepper
1 teaspoon table salt
2 pounds boneless, skinless chicken breasts , trimmed of fat (I only used two large breasts and it was fine)
1 cup plain whole-milk yogurt (I used fat free)
2 tablespoons vegetable oil
2 medium garlic cloves , minced
1 tablespoon grated fresh ginger

FOR THE MASALA SAUCE
3 tablespoons vegetable oil
1 medium onion, diced
2 medium garlic cloves, minced
2 teaspoons grated fresh ginger
1 fresh serrano chile, ribs and seeds removed, minced
1 tablespoon tomato paste
1 tablespoon garam masala
1 (28-ounce) can crushed tomatoes
2 teaspoons sugar
1/2 teaspoon table salt
2/3 cup heavy cream or plain non-fat yogurt
1/4 cup chopped fresh cilantro leaves (I omitted)

Directions:

FOR THE CHICKEN (STEP ONE)
In a small bowl, stir together cumin, coriander, cayenne and salt. Sprinkle both sides of chicken with spice mixture and press gently to adhere. Cover chicken and refrigerate for 30 minutes to one hour. While chicken is in fridge, in large bowl, whisk together yogurt, oil, garlic and ginger.

FOR THE MASALA SAUCE
In a large Dutch oven, heat oil over medium heat. Add onion and cook, stirring frequently, until lightly browned, about 8 to 10 minutes. Add garlic, ginger, chile, tomato paste and garam masala and continue to cook, stirring frequently, about 3 minutes. Add crushed tomatoes, sugar and salt and bring to boil. Reduce heat to medium-low, cover and simmer for 15 minutes, stirring occasionally. Stir in cream or yogurt and return to simmer. Remove pan from heat and cover to keep warm.

FOR THE CHICKEN (STEP TWO)
While sauce is simmering, Line a baking sheet with foil and place a wire rack over it. Spray rack with cooking spray. Adjust the oven rack to upper-middle position (about 6 inches from heat) and pre-heat broiler. Dip chicken into the yogurt mixture (you’re looking for a thick coating of yogurt) then arrange chicken on the wire rack. Discard excess yogurt mixture. Broil chicken until thickest parts register 160 degrees on instant-read thermometer and exterior is lightly charred in spots, 10 to 18 minutes, flipping chicken halfway through cooking.

TO ASSEMBLE
Let chicken rest for 5 minutes and then cut into 1-inch chunks. Stir into warm sauce (do not simmer chicken in sauce). Stir in cilantro, season with salt to taste and serve over rice with naan.

Yield: 4-6 servings


Read Full Post »

We have a white chicken enchilada recipe that we love and Brandon requests all the time but I kept reading great reviews of a recipe from America’s Test Kitchen. When I saw Josie blog about them and deemed them, “the best enchiladas ever,” I knew that I had to try this recipe. I think that Josie and I have really similar tastes. I don’t think she’s ever posted anything on her blog that I wouldn’t make. If you haven’t checked out her blog, Pink Parsley, you are totally missing out!

These enchiladas lived up to the hype. They were fabulous and I seriously couldn’t stop talking about how much I loved them. I think every time I took a bite I “mmm’d” and said “this is sooo good.” I couldnt’ wait to have the leftovers for dinner the next night. My favorite thing about them is that the enchilada sauce is homemade and not from a can. I am really trying to eliminate canned soups and sauces from our meals and this sauce was so much better than anything you can buy in a can and was relatively easy to make.

These enchiladas would be perfect for everything from a family dinner to entertaining to taking a meal to friends. I served them with Mexican Quinoa. A wonderful meal!

One Year Ago: Rocky Road Brownies (the FIRST recipe of 68 Days of Gourmet!)

Chicken Enchiladas
(Recipe source Pink Parsley, originally from America’s Test Kitchen)

Ingredients:

1 medium onion, diced
2 jalapenos, seeded and finely diced
1 teaspoon canola or olive oil
3 medium cloves garlic, minced
3 tablespoons chili powder
2 teaspoons ground cumin
3 teaspoons sugar
1 (15-ounce) can tomato sauce
1 cup water
1 large tomato, seeded and diced
1 pound boneless, skinless chicken breasts (2 large breasts)
1 cup extra sharp white cheddar, shredded
1 cup monterey jack cheese, shredded
1/2 cup minced fresh cilantro
12 (6-inch soft taco size) soft corn tortillas
Cooking spray
Salt and ground black pepper, to taste

Directions:

Preheat oven to 425 degrees. Spray a 9×13 baking dish with cooking spray and set aside.

Heat oil in a large saucepan over medium heat and add onion, jalapeno, 1/2 teaspoon salt. Cook, stirring often, until onions and peppers have softened, 8-10 minutes. Stir in garlic, chili powder, cumin and sugar. Cook until fragrant, about 30-60 seconds. Stir in tomato sauce, water and chopped tomato. Bring to a simmer and cook until slightly thickened, 5 minutes.

Nestle chicken into the sauce and reduce heat to low. Cover and cook until chicken is cooked through (internal temperature should read 160 degrees), about 12-20 minutes. Transfer the chicken to a plate and set aside to cool.

Strain the sauce through a strainer into a medium bowl. Press the onion mixture to extract as much liquid as possible. Transfer the onions to a large bowl and set aside. Season sauce with additional salt and pepper to taste.

Shred the chicken into bite-sized pieces and add to the onion mixture. Add 1/4 cup of the enchilada sauce, 1 cup cheese, and cilantro. Toss to combine.

Wrap tortillas in a paper towel and microwave on high until warm and pliable, 40-60 seconds. Working one tortilla at a time, spoon 1/3 cup of the chicken mixture evenly down the center of each. Tightly roll each tortilla and lay seam-side down in prepared baking dish.

Lightly spray the tops of the enchiladas with cooking spray. Place in the oven, uncovered, for about 7 minutes, or until the tortillas start to brown slightly.

Remove enchiladas from oven and reduce heat to 400 degrees.  Pour sauce evenly on top of enchiladas and top with the remaining cheese. Cover dish with foil, and bake an additional 20 minutes, or until heated through.

Remove foil and bake another 5 minutes, until cheese browns. Remove from oven and let stand 10 minutes before serving.

Serve with toppings of your choice: sour cream, guacamole, salsa, hot sauce, additional cilantro

Yield: 6-8 servings

Read Full Post »

I am not exaggerating when I say that I have no reason to ever try another chicken and dumplings recipe. This one is going straight to the “tried and true, will make this for years and years to come” file. I have tried a lot of chicken and dumplings recipes and have never been blown away by any of them – except for this Chicken Pie With Biscuit Crust but it’s not truly chicken and dumplings.

I was in the mood to cook on Saturday afternoon. I wanted to make a dinner that would take a while so that I could spend the evening hanging out in the kitchen, one of my favorite activities to relax and unwind. I chose this recipe from Tyler Florence because I loved that it featured homemade stock, sauce and dumplings. No canned stock, cream of yuckiness soup or refrigerated biscuits.

I made the stock by placing an organic/free range chicken in a pot with garlic, peppercorns, thyme and salt. I covered the chicken with water and boiled. This was a great reminder that homemade stock is easy and far superior in flavor to what you buy in the store. While I am guilty of buying stock, I will be trying to keep some homemade stock in the freezer moving forward. I only used about half the stock this rendered in the chicken and dumplings so I was able to freeze a good amount of leftovers!

I put Brandon to work shredding the cooked chicken while I prepared the sauce. I sauteed carrots, celery and garlic in a mixture of butter and oil and then added in flour to make a roux. I slowly incorporated the chicken stock and then added in extra veggies. I love that this recipe includes peas and pearl onions. The sauce simmered until it was thickened. You get a nice creaminess with the sauce by adding a little heavy cream at the end. Side note: please remember to taste your sauce as you go and season – you might need to add a good bit of salt.

Soon enough it was time to add the chicken and dumplings and sit back and watch magic happen. I love dropping the dough in and then seeing it turn into perfect dumplings.

While this is a labor intensive recipe, it is not hard. I highly encourage you to try this now that the temperatures are dropping and the leaves are turning. This dish is so comforting and it just feels good to eat it knowing that everything is made from scratch.

One Year Ago: Peanut Butter Chocolate Chip Banana Muffins

Chicken and Dumplings
(Recipe source Tyler Florence)

Ingredients:

FOR THE CHICKEN AND STOCK
1 (3 to 3 1/2 pound) whole organic chicken
2 bay leaves
6 sprigs thyme
4 to 5 black peppercorns
1 head garlic, split through the center (leave garlic unpeeled)
2 tablespoons kosher salt
Enough water to cover chicken

FOR THE DUMPLINGS
2 cups all-purpose flour
1 tablespoon baking powder
1 teaspoon salt
2 eggs
1/4 cup chopped chives
3/4 to 1 cup buttermilk

FOR THE SAUCE
2 tablespoons butter
2 tablespoons oil
2 carrots, diced
2 stalks celery, diced
2 cloves garlic, minced
2 bay leaves
1/4 cup all-purpose flour
6 cups chicken stock
1 cup frozen peas
1 cup frozen pearl onions
1/4 cup heavy cream
Freshly ground black pepper, for garnish
Chopped chives, for garnish

Directions:

FOR THE CHICKEN AND STOCK
Place the chicken and all stock ingredients in a large Dutch oven and cover with water. Bring water to a boil over medium-high heat and then reduce to a simmer.  Cook for one hour until the chicken is tender and internal temperature registers at least 165 degrees. Skim the surface of fat as it cooks.

Remove chicken from pot and place on a cutting board. Let rest until it is cool enough to handle. Strain the stock and set aside. When chicken has cooled, shred and set aside.

FOR THE DUMPLINGS
Sift the dry ingredients together in a large bowl. In a small bowl, using a whisk, lightly beat the eggs, chives and buttermilk together; pour the liquid ingredients into the dry ingredients and gently fold. Mix just until the dough comes together; the batter should be thick and cake-like.

FOR THE SAUCE
In a Dutch oven, over medium heat, add the butter and oil. Add the carrot, celery, garlic and bay leaves and saute until the vegetables are soft, about 5 minutes. Stir in the flour to make a roux and continue to stir for two minutes to coat the veggies in flour and remove the starchy taste. Slowly pour in the chicken stock, 1 cup at a time, stirring well after each addition. Add frozen peas and pearl onions.

Let sauce simmer, stirring occasionally, until it is thick enough to coat the back of a spoon, about 15 minutes. Stir in heavy cream.

Fold the reserved shredded chicken into the sauce and bring to a simmer. Using 2 spoons, carefully drop heaping tablespoonfuls of the dumpling batter into the hot mixture. The dumplings should cover the top of the sauce, but should not be touching or crowded. Let the dumplings poach for 10 to 15 minutes until they are firm and puffy. Discard the bay leaves, season with freshly cracked black pepper and garnish with chopped chives before serving.

Yield: 6-8 servings

You can become a fan of Peanut Butter Runner and Bakin’ and Eggs on Facebook!

Read Full Post »

I was born and raised in Georgia and one of my favorite Southern foods is cornbread. Especially the old fashioned, slightly sweet variety that is baked in a cast iron skillet with plenty of butter and topped with honey. When I saw this recipe on Pink Parsley for Jalapeno Cheddar Cornbread, I decided I would have to stray from my old favorite and give it a try.

I’m so glad I did. This is nothing like traditional cornbread but it’s a fun twist on the classic. The addition of sharp cheddar cheese, fresh jalapenos and scallions is delicious and I just have to mention how fabulous this smells when it’s baking. I made this to take to a family dinner and I had to use all of my willpower not to sneak a taste of it on the car ride over.

This recipe makes a ton. I served it to eight people and had a good bit leftover but the recipe could be easily halved and it also freezes really well.

I think this would be a perfect bread side item for a summer cookout. I also think it would be nice to make these as muffins if you’re feeding a crowd so that it’s easier to grab and go. Just some ideas for you!

Jalapeno Cheddar Cornbread
(Recipe source Pink Parsley, originally published in Barefoot Contessa at Home)

Ingredients:

3 cups all-purpose flour
1 cup yellow cornmeal
1/4 cup sugar
2 tablespoons baking powder
2 teaspoons kosher salt
2 cups buttermilk
3 large eggs, slightly beaten
1/2 pound (2 sticks) unsalted butter, melted, plus extra to grease the pan
8 ounces extra-sharp cheddar, grated
1/3 cup chopped scallions (3-4 scallions)
3 tablespoons fresh jalapeno peppers, seeded and minced (2-3 peppers)

Directions:

In a large bowl, sift together flour, cornmeal, sugar, baking powder and salt. In a separate bowl, combine buttermilk, eggs  and butter. Make a well in the center of the dry ingredients and pour in wet ingredients. Stir until just combined and then mix in 2 cups of the cheddar, scallions and jalapenos. Stir until just combined, being careful not to overmix.

Allow the mixture to sit at room temperature for 20 minutes. Meanwhile, preheat the oven to 350 degrees and grease a 9 x 13 baking dish. Spread the batter into prepared baking dish and sprinkle with the remaining cheddar.

Bake for 30-35 minutes, or until a toothpick inserted in the center comes out clean. Cool slightly and cut into squares to serve.

Yield: 12 large servings (these would be really big!) or 24 smaller squares

Read Full Post »

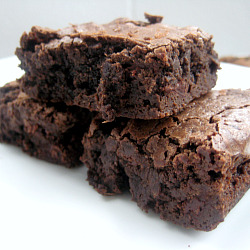
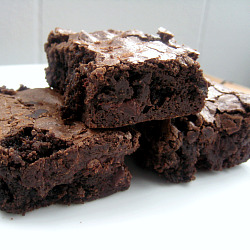
Let’s get straight to the point. These are without a doubt the best homemade brownies I’ve ever had. Ever. They are chocolaty, fudgy, rich and indulgent. The best part about these brownies is that I didn’t have to make them! We visited my parents in Atlanta several months ago and my dad had these ready for us when we arrived. We actually had dinner reservations that night at Top Chef contestant Kevin’s restaurant, Woodfire Grill, but I couldn’t resist sampling them. Totally worth slightly spoiling my appetite over! 🙂

Over the course of the visit I ate my fair share of these brownies. We took the leftovers home with us and made them even more ridiculously indulgent by serving them sundae style with ice cream and chocolate syrup. There was no brownie left behind.

All brownie lovers must try this recipe – even if you usually rely on boxed mixes. They are truly outstanding and will put any boxed brownie mix to shame. I will admit that I used to use boxed brownie mixes until I realized several years ago how easy homemade brownies are and produce far tastier results. They are so worth the little bit of extra effort required!

Chewy, Fudgy Triple Chocolate Brownies
(Recipe source Cooks Illustrated, May 2000)

Ingredients :

5 ounces semisweet or bittersweet chocolate, chopped
2 ounces unsweetened chocolate , chopped
8 tablespoons (1 stick) unsalted butter, cut into quarters
3 tablespoons cocoa powder (either Dutch-processed or natural cocoa works well in this recipe)
3 large eggs
1 1/4 cups granulated sugar
2 teaspoons vanilla extract
1/2 teaspoon salt
1 cup unbleached all-purpose flour

Directions:

Adjust oven rack to lower-middle position and preheat oven to 350 degrees. Spray an 8-inch square baking pan with nonstick cooking spray. Fold two 12-inch pieces of foil lengthwise so that they measure 7 inches wide. Fit one sheet in bottom of greased pan, pushing it into corners and up sides of pan. Fit the second sheet in pan in same manner, perpendicular to first sheet. Spray foil with nonstick cooking spray. The foil overhangs will help you lift the brownies out of the pan.

Place a medium heatproof bowl over a pan of almost-simmering water. Melt chocolates and butter, stirring occasionally until mixture is smooth. Whisk in cocoa until smooth. Set aside to cool slightly. Alternatively, you can melt chocolates and butter in a microwave safe bowl. Cook on 50 percent power, stopping to stir ever 30 seconds, until mixture is smooth.

In a separate medium bowl, whisk together eggs, sugar, vanilla and salt until combined, about 15 seconds. Whisk warm chocolate mixture into egg mixture; then stir in flour with wooden spoon until just combined. Pour mixture into prepared pan, spread into corners and level surface with rubber spatula. Bake until slightly puffed and toothpick inserted in center comes out with a small amount of sticky crumbs clinging to it, 35 to 40 minutes.

Completely cool brownies on a wire rack to room temperature, about 2 hours. (This is a very crucial step – I know it’s hard but you have to let them completely cool!) Remove brownies from pan using foil handles. Cut into 1-inch squares and serve. (Do not cut brownies until ready to serve; brownies can be wrapped in plastic and refrigerated up to 5 days.)

Read Full Post »

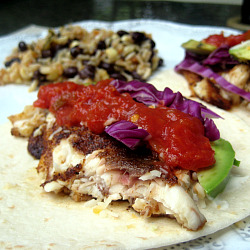
Fish tacos are one of my favorite easy, healthy dinners. They are also a perfect warm weather dinner. As we were eating these we talked about how fun it would be to entertain with a make-your-own fish taco bar and margaritas or sangria. Just might have to do that soon!

Another great thing about fish tacos is that they can be totally customized based on your flavor and topping preferences. We happen to love ours finished with this Baja Cream that I discovered when I was making these shrimp tacos. I like to serve all of the toppings on a big platter so we can each build our own tacos.

I usually use a mild white fish and saute it with a Dizzy Pig rub like Jamaican Firewalk or Shakin’ the Tree.

If you’ve been reading my blog for a while you should be familiar with these rubs. I can’t sing The Dizzy Pig’s praises enough. These rubs have the best flavor and use high quality ingredients. Also, their customer service is awesome!

I’m sharing my base recipe for fish tacos but feel free to change it up to meet your tastes. But whatever you do, don’t skip out on the Baja cream – even if you’re not a mayonnaise fan – it sounds so simple but adds a wonderful, bright flavor to the tacos.

One year ago: Greek Inspired Flounder

Fish Tacos with Baja Cream
(Recipe source: tacos – Bakin’ and Eggs, baja cream – Bon Appetit)

Ingredients:

FOR THE BAJA CREAM
1/4 cup mayonnaise
1/4 cup sour cream
1 tablespoons fresh lime juice
1/2 teaspoon (packed) finely grated lime peel
Salt, to taste

FOR THE TACOS
1 1/2 pounds white fish fillets such as tilapia, flounder or mahi
Seasoning rub of your choice – recommended Dizzy Pig’s Jamaican Firewalk
2 tablespoon olive oil
Shredded red or purple cabbage
Shredded cheese such as cheddar, colbyjack or your choice
1 avocado, sliced
Salsa
Lime wedges
Hot sauce, such as Cholula
8 soft taco sized tortillas

Directions:

FOR THE BAJA CREAM
Whisk all ingredients in small bowl. Cover and refrigerate. (Can be made up to 3 days ahead.)

FOR THE TACOS
Drizzle fish with olive oil and coat with seasoning rub. In a large, nonstick pan over medium-high heat, heat olive oil. Add fish and cook about 3 minutes per side or until internal temperature reaches 145 degrees. Remove fish from pan and cut into slices.

Arrange Baja cream and toppings on a platter and serve with fish and warmed tortillas (I usually wrap mine in a paper towel and microwave for about 30 seconds).

Yield: 4 servings

Read Full Post »

68 Days of Gourmet: Day 61

Gourmet named this recipe Spicy Boiled Crabs, Shrimp, Potatoes, Corn and Garlic. I put a Southern spin on it by subbing sausage for the crabs and calling it by its true name, Lowcountry Boil. I think the crabs would have been a fun addition but not in the realm of  possibility for tonight’s dinner.

Lowcountry Boil is a simple, one-pot dinner full of deliciousness. We served it at our rehearsal dinner when we got married in Charleston and requested it for our joint birthday party last year. It’s a great party/entertaining dish but also fun and easy for any night! You can easily scale the amount of ingredients to the number of people you’ll be serving. It’s also easy to control the spice level. If you love spicy foods, feel free to be a little heavy-handed with the seasonings. You cook this in such a big pot that the spices are really diluted.

It’s also relatively healthy and filling. We usually sub chicken or turkey smoked sausage. My favorite way to serve Lowcountry Boil is on a big platter so everyone can pick and choose what they want. And really hot homemade cocktail sauce (the more horseradish, the better!) on the side.

If you’ve never experienced Lowcountry Boil it is a must try this Spring/Summer. Perfect for your next get together – casual, a little messy and fun! I can just picture serving this outdoors with rolls of paper towels and sweet tea in mason jars – what can I say? I was definitely born and raised in the South!

One Year Ago: Easy Spanakopita

Lowcountry Boil
(Recipe adapted from Gourmet, June 1996)

Ingredients:

2 (3-ounce) packets Zatarain’s crab boil or 5 tablespoons Old Bay  seasoning (or more – adjust to taste)
1 tablespoon cayenne (or more adjust to taste)
1/2 cup table salt (might want to reduce to around 1/4 cup)
3 lemons, quartered
2 onions, halved
1 1/2 pounds small potatoes (about 2 inches in diameter)
2 whole heads of garlic (not separated into cloves)
6 ears of corn, shucked and halved
24 ounces smoked sausage (2 packages), cut into 2 inch pieces
2 tablespoons Old Bay Seasoning, or to taste, for sprinkling over  boiled seafood
3 pounds large shrimp (about 30, preferably with heads)

Directions:

In a very large stock pot or kettle (7- to 8-gallons) bring 5 gallons water to a boil.

Add Zatarain’s crab boil or 5 tablespoons Old Bay seasoning, cayenne, salt, lemons and onions to boiling water and boil 5 minutes. Add potatoes and garlic and boil for about 10 minutes. Add corn and sausage and cook for about 5-10 more minutes, until corn and potatoes are tender.

Add shrimp and cook until they turn bright pink, about 2-3 minutes, careful not to overcook. Drain pot and transfer to a platter. Sprinkle with Old Bay seasoning and serve with cocktail sauce.

Yield: 6 servings

Read Full Post »

67 Days of Gourmet: Day 58

I’m really embarrassed to admit that tonight was the first time I’ve cooked with quinoa. Bad foodie, especially given my love for all things healthy, whole grain and nutrient packed. 😦 And I’ve had it from the hot bar at Whole Foods and Earth Fare, just haven’t cooked with it yet.

I’ve been meaning to make this recipe for the last couple months. Every time I made homemade Mexican this was on the menu but I kept bailing on it. Every time I went to Harris Teeter I was annoyed that they were charging $5 for a small bag of quinoa. I was picking up a few things at Earth Fare this weekend and was so excited to find awesome bulk prices on all kinds of grains. I stocked up on quinoa and rolled oats.

I can’t believe I waited so long to make this. Whether you’re a quinoa lover or someone who has never tried it, this is a must try recipe. The flavors are so well balanced with the quinoa, black beans, fresh corn, bell pepper and jalapenos and the lime/oil based dressing is the perfect finish. I’m so looking forward to enjoying the leftovers for lunch this week topped with diced avocado and an extra squeeze of lime and know I’ll be making this many more times in the future.

BIG NEWS #1
YOU HAVE SUCCESSFULLY REGISTERED FOR THE 35th MARINE CORPS MARATHON! I did it! I registered! I’m beyond excited. And even better news, my friend Meghan registered to run it too! This will be her first marathon. I can’t even put into words how happy I am that I won’t be running this race alone!

BIG NEWS #2
I’m launching a Healthy Living blog!!! Don’t worry, Bakin’ and Eggs isn’t going anywhere but I’ve really been conflicted over whether to continue discussing fitness/my life on this blog or whether I should start a new blog. In the end, I decided that the healthy living blog was the best way to go. The name has been selected, the domain has been registered and I’m in the process of getting it all set up. I promise that I’ll let you all know the second it goes live!

Please try this quinoa recipe and then let me know what you think!

One Year Ago: Fresh Strawberry Scones

Black Bean and Quinoa Salad
(Recipe source Gourmet, July 1994)

Ingredients:

1 1/2 cups quinoa
1 1/2 cups cooked black beans, rinsed if canned
1 1/2 tablespoons red-wine vinegar
1 1/2 cups cooked corn (cut from about 2 large ears)
3/4 cup green bell pepper, finely chopped
2 pickled jalapeño chilies, seeded and minced (wear rubber gloves)
1/4 cup finely chopped fresh coriander (I subbed a bit of ground coriander because the store did not have fresh)

FOR THE DRESSING
5 tablespoons fresh lime juice, or to taste
1 teaspoon salt
1 1/4 teaspoons ground cumin, or to taste
1/3 cup olive oil

Directions:

In a bowl wash quinoa in at least 5 changes cold water, rubbing grains and letting them settle before pouring off most of water, until water runs clear and drain in a large fine sieve. (I attempted this step but my quinoa went right through my sieve so I skipped this step and just cooked it as is. Turned out totally fine.)

Bring a pot of salted water to a boil. Cook quinoa 10 minutes. Drain quinoa in sieve and rinse with cold water. Set sieve over a saucepan of boiling water (quinoa should not touch water) and steam quinoa, covered with a kitchen towel and lid, until fluffy and dry, about 10 minutes (check water level in pot occasionally, adding water if necessary).

While quinoa is cooking, in a large bowl toss beans with vinegar and salt and pepper to taste. Add bell pepper, jalapenos, corn and coriander.

Let quinoa cool a bit then add to bean mixture and toss well.

FOR THE DRESSING
In a small bowl whisk together lime juice, salt and cumin. Add oil in a slow stream, whisking constantly.

Drizzle dressing over salad and toss well.  Salt and pepper to taste.

Yield: 4 to 6 as an entrée or 8 as a side dish

Note: I cut this recipe in half and it made plenty for 2 with lots of leftovers!

Read Full Post »

68 Days of Gourmet: Day 28

Happy New Year everyone! The holidays have been busy for us with lots of family time and traveling. Since we spent Thanksgiving with my family this year, we stayed in Charlotte and celebrated Christmas with Brandon’s family. We rang in the new year in Asheville with The Avett Brothers and then headed to Atlanta on New Year’s Day for yet another Avett Brothers show and to spend the weekend with my family. It was so good to see them! My mom, Brandon and I went to the Georgia Aquarium on Saturday afternoon while my dad stayed home prepping our amazing dinner! He made Paul Prudhomme’s Seafood Gumbo. SO DELICIOUS! He made his own seafood stock and made the perfect roux. It was exactly the dark color of Paul’s in the book. It was full of oysters, crab, shrimp and fresh andouille! I roasted up some okra for a side dish and my mom made my favorite banana pudding recipe. Yum! I love going home and enjoying my parents cooking! 🙂

I was happy to arrive home yesterday and get back in the swing of our normal routine. I attend an incredible hot yoga class every Sunday afternoon at 4. It’s the perfect way to end my weekend and prepare my mind and body for the work week ahead. Since I was a little crunched on time given our afternoon arrival home and wanting to make my yoga class, I was looking for an easy meal. It is freezing here (seriously – lows in the teens, highs in the 30s – that is cold in the South!) and slow cooked meat sounded like the perfect dinner. Our grocery store had chuck roasts on sale so off I went to Epicurious to look for a Gourmet magazine pot roast recipe.

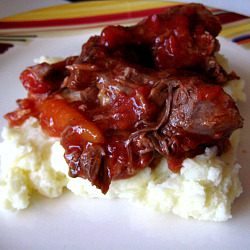
I found this recipe for Oven Braised Beef with Tomato Sauce and Garlic. It only had three ingredients and had received numerous positive reviews. Decision made. You don’t even brown the beef before placing it in the dutch oven! Can it get any easier than that? Off I went to the grocery to grab the ingredients. I threw everything in my dutch oven before I left for yoga and came home to an amazing smelling house!

I was a little nervous because the recipe called for so much garlic but it really mellows out in the oven during the long, slow cook and adds a wonderful flavor. I admit that I added a couple carrots and some onion during the last hour of cooking but it totally wasn’t necessary! I just wanted more veggies. Brandon decided that this should be my “go-to” method for cooking roasts.

I served last night’s roast over mashed potatoes with a salad and french bread. I’m making shredded beef enchiladas with the leftovers tomorrow night.

And now for the announcement:
If you’ve read the “About Jen” section of this site you know that my second love is fitness and nutrition. One of the questions I get all the time is, “How do you cook and bake all that food and stay fit?” Well…I’m going to start sharing that information with you on the blog. Don’t worry, I’m not changing the focus of this blog. It is definitely still first and foremost a food blog but I am going to talk about my nutrition and exercise for the day/week in my posts. If you’re not into it – simply scroll down for the recipe!

In a nutshell, it’s all about maintaining a balance. I’m going to talk about that balance in my posts. I hope I can provide a little bit of motivation and inspiration that you can enjoy delicious food and stay fit!

Let me know what you think in the comment selection below and if you have any questions! Eventually, I hope to add separate fitness and nutrition page to the blog but that’s later in 2010!

And now for the most delicious 3 ingredient roast recipe…

Oven Braised Beef with Tomato Sauce and Garlic
(Recipe adapted from Gourmet, February 2001)

Ingredients:

28 ounce can crushed tomatoes
3-3 1/2 pound boneless chuck roast, trimmed
1 head of garlic, separated into cloves (unpeeled)
Salt and pepper, to taste

Optional: potatoes, carrots, onions or any other vegetables you’d like to add
Accompaniment: mashed potatoes, orzo or egg noodles

Directions:

Preheat oven to 300 degrees. Generously salt and pepper roast. Place roast in a large dutch oven. Pour tomatoes over the roast and then scatter around garlic cloves.

Cover and bake for 3-4 hours, until roast is very tender and shreds easily. Break into chunks or shred and serve.

Yield: 6 servings

*Note: if you’d like to add extra vegetables, add them when you have about 1 hour left in cooking.

Read Full Post »

Older Posts »