Feeds:
Posts
Comments

Archive for the ‘Basics’ Category

68 Days of Gourmet: Day 68

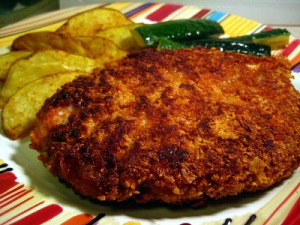
Are you thinking what I was thinking when I first saw this recipe? Gourmet has a recipe for Cornflake Fried Chicken? I was really shocked! I knew it was something that Brandon would love and I had some cornflakes in the pantry that needed to be used. I made several modifications to the original recipe that included dredging in flour before egg and adding spices to the cornflakes. I decided to bake mine instead of frying it and it turned out great. We did a taste test with Brandon’s fried and my baked and while the baked was definitely missing out on the “fried chicken” taste it was okay with me! Chicken breasts are so big when you pound them out so I saved half of mine to eat over a salad for lunch tomorrow.

I taught BodyPump tonight at the Y. There were 32 people in the class! So exciting. I’m going to yoga tomorrow morning – so looking forward to it after two days out of the studio. After work, Brandon and I are working on making chocolate butterfly wings for the butterfly cupcakes I’m making for my niece’s 2nd birthday Saturday. I am so thankful to have his help with the wings because he just has so much more patience with this type of thing. We’re heading to Sole for a late dinner to take advantage of their Charlotte Restaurant Week menu.

We have a really good chance of getting some snow this weekend! We’ve had two close calls this winter but no snow yet so keep your fingers crossed šŸ™‚

Cornflake Fried Chicken
(Recipe adapted from Gourmet, July 2008)
Printable Recipe

Ingredients:

2 boneless, skinless chicken breast
1/4 cup flour
1 large egg
1/4 cup milk
2 1/2 cups cornflakes
Paprika or cayenne pepper, optional
1/3 cup vegetable oil
Salt and pepper, to taste

Directions:

Pound out chicken to 1/2 inch thickness (in a plastic bag or between two sheets of plastic wrap or wax paper).

Set up three shallow bowls. Put flour in the first and season with salt and pepper. In the second bowl, whisk together egg and milk. In the third bowl, crush cornflakes and toss with 1/4 teaspoon each of salt and pepper and cayenne and paprika to your liking (about 1/2 teaspoon) if desired.

Heat oil in a large nonstick skillet over medium heat until hot.

Meanwhile, season chicken with 1/4 teaspoon each of salt and pepper. Dredge in flour mixture, shaking off excess flour and then dip in egg mixture, then in cornflakes, pressing to help adhere.

Fry chicken, turning once, until golden and just cooked through, 5 to 6 minutes total. Internal temperature should be 160 degrees. Drain on paper towels.

*Note – I baked mine on a wire rack at 400 degrees for about 10-12 minutes, until internal temperature reached 160.

Yield: 2 servings
Read Full Post »

altonturkey

Two posts in one day? I can honestly say I never thought this would happen but this turkey is just too beautiful not to share with my readers while everyone is planning Thanksgiving menus. I can’t take any credit for this bird – it’s my dad’s practice turkey for Thanksgiving. He made this last weekend on the Big Green Egg using Alton Brown’s Good Eats Roast Turkey recipe. If you’re looking for a turkey recipe I think you should give Alton’s a try. I was shocked to see it has received 2,289 reviews and still has 5-stars. Pretty impressive! My dad was very pleased with how this turkey turned out and will be using this recipe on Thanksgiving day.

One of the benefits of cooking your turkey on the Egg is having your oven space available for all your sides and desserts. Also, the smoke flavor and crisp skin is delicious! If you don’t have an Egg, no worries. Alton’s recipe provides step-by-step instructions for the oven.

The only thing my dad did differently was let the turkey air-dry in the fridge for 12 hours before cooking. This dries the skin to help it become golden and crisp while cooking.

Can’t wait to try this turkey on Thanksgiving day!

Good Eats Roast Turkey on the Big Green Egg
(Recipe adapted from Alton Brown)
Printable Recipe: Good Eats Roast Turkey on the Big Green Egg

Cook Time:

BRINE
14-16 hours (1 hour per pound)

AIR CHILL
12 hours

COOK TIME
2 hours 30 min (max)

Ingredients:

1 (14-16Ā  pound) fresh turkey

FOR THE BRINE
1 cup kosher salt
1/2 cup light brown sugar
1 gallon vegetable stock
1 tablespoon black peppercorns
1 1/2 teaspoons allspice berries (my dad substituted 1/2 teaspoon cinnamon)
1 1/2 teaspoons chopped candied ginger
1 gallon heavily iced water

FOR THE AROMATICS
1 red apple, sliced
1/2 onion, sliced
1 cinnamon stick
1 cup water
4 rosemary sprigs
6 sage leaves
Canola oil

Directions:

TO MAKE THE BRINE
Combine the vegetable stock, salt, brown sugar, peppercorns, allspice berries and candied ginger in a large stockpot over medium-high heat. Stir occasionally to dissolve solids and bring to a boil. Remove the brine from heat, cool to room temperature and refrigerate.

TO BRINE THE TURKEY
The day before you’re roasting your turkey, combine the brine, water and ice in the 5-gallon bucket. Place the turkey (with innards removed) breast side down in brine. If necessary, weigh down the bird to ensure it is fully immersed. Cover and refrigerate or set in cool area for one hour per pound. Turn the bird once halfway through brining if your turkey is not fully submersed.

After brining time is up, remove the bird from the brine, rinseĀ and pat dry. Place in refrigerator and allow to air chill overnight, about 12 hours.

TO ROAST THE TURKEY
If using the Egg, set it up with a plate setter or pizza stone. Place a cast iron grate (feet side up) on top of that and finally you’ll place the turkey in a roasting pan on top of that (after Egg is preheated). Preheat the oven or Big Green Egg to 500 degrees.

Combine the apple, onion, cinnamon stick and 1 cup of water in a microwave safe dish and microwave on high for 5 minutes. Add steeped aromatics to the turkey’s cavity along with the rosemary and sage. Tuck the wings underneath the bird and coat the skin liberally with canola oil.

Roast the turkey in the Big Green Egg with lid down or on lowest level of the oven for 30 minutes. Insert a probe thermometer into thickest part of the breast and reduce the oven temperature to 350 degrees (or bring the grill temperature down). Set the thermometer alarm (if available) to 161 degrees and remove the turkey to rest when it reaches this temperature. (After 2 hours my dad’s turkey was 163 degrees in the breast and 171 degrees in the thigh).

Let the turkey rest, loosely covered with foil for at least 15 minutes before carving.

Read Full Post »

68 Days of Gourmet: Day 6

buttermilkbiscuit

One of my favorite things to do on the weekend is cook a big breakfast. We usually either have waffles or pancakes and bacon or eggs, grits, biscuits and sausage or bacon. I’ve been trying different biscuit recipes the last couple months in an attempt to perfect my biscuit making skills. I figured I’d try one from Gourmet since I’m doing 68 Days of Gourmet.

Overall, I was pleased with how these buttermilk biscuits turned out. I loved the size of them and they were a nice mix of tender on the inside and sturdy on the outside. You could definitely make a breakfast sandwich biscuit out of these and they wouldn’t crumble or fall apart.

They were a nice accompaniment to our breakfast and very tasty topped with apple butter. Brandon has requested an egg and cheese biscuit tomorrow morning with the leftovers.

biscuitdough

Buttermilk Biscuits
(Recipe source Gourmet, June 2005)

Ingredients:

1 1/2 cups all-purpose flour
1 1/2 tablespoons sugar
1 1/2 teaspoons baking powder
Rounded 1/4 teaspoon salt
1/4 teaspoon baking soda
1/2 stick (4 tablespoons) cold unsalted butter, cut into 1/2-inch cubes
3/4 cup buttermilk
1 tablespoon milk or cream for brushing tops of biscuits

Directions:

Preheat oven to 425 degrees.

Sift together twice flour, sugar, baking powder, salt and baking soda. Blend in butter with your fingertips until mixture resembles coarse meal. Add buttermilk and stir with a fork until dough just forms (dough will be moist). Do not over mix.

Turn dough out onto a well-floured surface and knead gently 6 times with floured hands. Pat out dough into an 8- by 5 1/2-inch rectangle, reflouring work surface if necessary. Using a floured knife, cut rectangle in half lengthwise, then into thirds crosswise to form 6 (2 1/2-inch) squares. Using a spatula, transfer biscuits to an ungreased baking sheet, leaving 2 inches between each biscuit. Brush tops with milk or cream and bake on middle rack until pale golden, 12 to 15 minutes. Transfer to a wire rack and cool.

Yield: 6 biscuits

biscuitapplebutter

Read Full Post »

lasagnapan

I have a confession. There are a few simple things that I just cannot seem to master. Among those are pancakes, gravy, biscuits and lasagna. Seriously, who can’t make pancakes and lasagna? It’s embarrassing. Well, last weekend I was craving traditional lasagna. This is strange for me because I’m not the biggest traditional meat lasagna fan – I usually go for the veggie stuff. I’m good about trying to overcome my culinary weaknesses so I decided to give it a go. I researched recipes for longer than I’d like to admit before finally deciding on this Sausage, Cheese and Basil Lasagna on epicurious.com. I figured if it had received 4-fork reviews from 325 people it must be good.

I’m happy to report that it wasn’t just good…it was awesome. I probably said to Brandon five times during dinner, “Wow, this is really delicious. I can’t believe I made good lasagna.” I loved the flavor combination with the homemade sauce, Italian sausage and fresh basil. I’ve decided that I prefer using all Italian sausage versus a sausage/ground beef mixture. If you’re going to make this lasagna DO NOT skip making the homemade sauce. It is so simple and makes a huge difference in the flavor.

Now on to modifications that I did make to the original recipe. First, I read multiple reviews that there was not enough sauce. I corrected this by using a smaller pan – 9 x 11 instead of 9 x 13. It was just Brandon and me and we can never finish a whole pan anyway. Alternatively, I recommend increasing the sauce recipe by one half. It would have been nice to have extra sauce for the leftovers too. Second, I was totally not in the mood to deal with cooking and draining lasagna noodles. I decided to throw caution to the wind and just use uncooked noodles in the lasagna (I didn’t even use the “no-boil” noodles). I rinsed them in water first to dampen them and made sure they were completely covered by sauce. I was extremely pleased to find that they’d cooked perfectly when I served the lasagna.

One final recommendation is to make sure to letĀ  your lasagna rest for at least 15 minutes before serving. I think this makes the biggest difference in having a pretty lasagna that holds together and doesn’t turn into a mess on the plate.

So now that I’ve overloaded you with my ramblings and recommendations, here’s the recipe.

Sausage, Cheese and Basil Lasagna
(Recipe source epicurious.com, originally printed in Bon Appetit)

Ingredients:

FOR THE SAUCE
1 pound spicy or sweet (your preference) Italian sausage, casings removed
2 tablespoons olive oil
1 large onion, diced
3 large garlic cloves, minced
2 teaspoons dried oregano
1/4 teaspoon dried crushed red pepper
1 (28-ounce) can crushed tomatoes
1 (14 1/2-ounce) can diced tomatoes, undrained

FOR THE FILLING
1 1/2 cups (packed) fresh basil leaves, finely chopped
1 (15-ounce) container plus 1 cup part-skim ricotta cheese
1 1/2 cups grated mozzarella cheese (about 6 ounces)
3/4 cup grated Parmesan cheese (about 2 ounces)
1 egg
1/2 teaspoon salt
1/4 teaspoon ground black pepper

FOR THE ASSEMBLY
12 lasagna noodles
3 cups grated mozzarella cheese (about 12 ounces)
1 cup grated Parmesan cheese (about 3 ounces)
Nonstick cooking spray
Aluminum foil

Directions:

FOR THE SAUCE
Brown Italian sausage in a large saucepan over medium heat until crumbly and cooked through. Drain and wipe down pan.

Heat olive oil in same pan over medium heat. Add onions and cook for about 5 minutes, until they begin to look transparent and soft. Add garlic, red pepper and oregano and cook for another 2-3 minutes. Add crushed and diced tomatoes and cooked sausage and bring mixture to a boil. Reduce heat and let simmer for about 10 minutes. Season with salt and pepper.

FOR THE FILLING
Mix all ingredients together in a bowl until combined.

FOR THE ASSEMBLY
Preheat oven to 375 degrees. Prepare a 9 x 13 glass baking dish with cooking spray. Spread 1 1/4 cups sauce in bottom of baking dish. Arrange 3 noodles on sauce. Drop 1 1/2 cups filling over noodles and spread evenly to cover. Sprinkle with 3/4 cup mozzarella cheese and 1/4 cup Parmesan cheese. Repeat layering of sauce, noodles, filling and cheeses 2 more times. Top with remaining 3 noodles. Spoon remaining sauce over noodles. Sprinkle with remaining cheeses. Spray large piece of foil with nonstick cooking spray. Cover lasagna with foil, sprayed side down.

Bake lasagna 40 minutes. Carefully uncover and increase oven temperature to 400 degrees. Bake until noodles are tender, sauce bubbles thickly and edges of lasagna are golden and puffed, about 20 more minutes. Remove from oven and let stand at least 15 minutes before serving.

Yield: 8 servings

lasagna

Read Full Post »

marinara

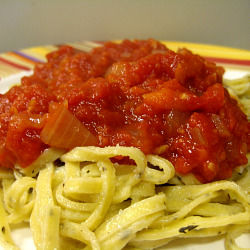
Last weekend we picked up some fresh pasta from Pasta Provisions here in Charlotte. It’s a great locally owned Italian grocery. We chose their garlic and rosemary linguine. I was stumped on what sauce to serve with this pasta. Brandon loves red sauce so I decided to keep it simple with an easy marinara full of tomato, garlic and basil.

My dad shared this marinara recipe with me years ago. It’s super simple and so much more flavorful than jarred pasta sauce. It was the perfect complement to our pasta and reminded me that I should keep this in the freezer at all times so I can avoid using jarred sauce onĀ  week nights!

Easy Marinara
(Recipe source my Dad)

Ingredients:

1/4 cup olive oil
1 small onion, diced
2 cloves garlic, crushed and diced
1 stalk celery, broken into 4 pieces
1 carrot, finely diced
32 ounce high quality crushed tomatoes (recommended San Marzano)
2 bay leaves
Dash of sugar
Shot of red wine
Salt and pepper, to taste
Fresh basil, julienned

Directions:

Heat large saucepan over medium heat. Add olive oil and heat until shimmering. Add onions and saute for about 5 minutes, until they begin to become translucent. Add garlic, celery and carrot and cook for another 5 minutes. Add wine, tomatoes, bay leaves, sugar and red wine. Simmer for 1 hour over low heat, uncovered. Season with salt and pepper and stir in fresh basil right before serving.

Yield: 4 servings

Read Full Post »

grilledshrimp

My parents just moved to Atlanta a few weeks ago. I went to visit last weekend while Brandon was in Vegas. My dad discovered the Dekalb Farmers Market and told me to bring a cooler so I could stock up. We spent our Sunday there – I was in heaven! If you live near Atlanta I highly recommend that you make a trip to check it out. Their prices are incredible. It’s really not a farmers market in the traditional sense. It started out as a produce stand in the 70’s and has grown into a Whole Foods/Trader Joe’s on steroids. If you’re familiar with Central Market in Texas it’s very similar. I could go on and on but I’ll spare you!

So I returned home yesterday with a trunkful of goods courtesy of my parents! One of the things I chose was the beautiful gulf shrimp you see in the photo above. Brandon had mentioned several times that he’d like to try to grill some of the jumbo shrimp so I thought he’d love these.

We grilled the shrimp tonight and served them with organic yellow grits and sauteed squash and zucchini (all from the Delkab Farmers Market). It was a delicious dinner and a nice change from heavy winter foods.

Grilled Shrimp
(Recipe source Bakin’ and Eggs)

Ingredients:

1 lb jumbo shrimp (16-18 shrimp per pound)
Olive oil
Seasoning of your choice – you could go as simple as olive oil, salt and pepper – we used a combination of The Dizzy Pig Tsunami Spin and Swamp Venom)

Directions:

Peel and devein shrimp, leaving tails on. Coat shrimp with a thin layer of olive oil and seasoning of your choice and let sit for about 30 minutes.

While shrimp is marinating, preheat grill to 400 degrees.

Grill shrimp for about 2-3 minutes per side, until the shrimp curl and are no longer pink. Serve immediately.

Yield: 2-3 servings

grilled-shrimp-plate

Read Full Post »

Caramelized Onions

caramelizedonion

Last Saturday we hosted a baby shower for our friends Cristen and Graham (see the awesome cake I made them in the post below). The theme was a cookout – too bad it was freezing, rainy and ended up snowing three inches the next morning! We decided to stick with the cookout theme and everyone had fun anyway – we just stayed inside except for some of the brave guys who went out to grill the burgers.

I wanted to put a new spin on the burgers so we decided to do fun toppings. We had bacon, caramelized onions, blue cheese, sharp cheddar, pepperjack, BBQ sauce, lettuce, tomato, pickles, mayo, mustard and ketchup. Everyone loved the “make your own burger bar” and the caramelized onions were a big hit.

These are a staple and I wanted to share my method for no-fail caramelized onions. These will keep in the fridge for a week or so. You can make them ahead of time or make a batch and use them as you need them.

Caramelized Onions
(Recipe source me!)

Ingredients:

White, yellow or sweet onions (as many as you’d like to cook – remember they cook down a ton. Make more than you think you need)
Salt
Sugar
Olive Oil

Directions:

Slice onions thinly. Place in a medium bowl and sprinkle with sugar and salt. Toss and let sit for a little while – anywhere from 15 minutes to a couple hours.

Heat a couple tablespoons of olive oil in a heavy bottomed pan (like Le Creuset) or in a cast iron skillet over medium to medium-high heat. Add onions and cook, stirring frequently for about 10 minutes or until they begin to brown. Reduce heat to medium-low and continue cooking onions for about 10 to 15 more minutes until they are golden colored. Watch them carefully and stir frequently to prevent burning.

Remove from heat and serve or store in an air-tight container in the fridge for up to a week.

Read Full Post »

Chili

What better way to get started than with a tried and true recipe of my Dad’s? Chili! Brandon usually starts asking for chili as soon as football season starts but I’m one of those people who just can’t do chili until it gets cold out – and in the South, who knows when that will be? Lucky for Brandon, it got chilly pretty early this year so I made a big pot of chili while he enjoyed Sunday NFL football.

And check out the special ingredient you add in the last 10 minutes of cooking…who’d of thought?

Chili
(Source: My Dad)

Ingredients:
3 cloves garlic
1 large onion
1 1/2 lbs lean ground beef
2 15 oz cans diced tomatoes
1 15 oz can, 3/4 full of water
3-4 tbsp chili powder (to taste)
1 tsp salt
1/2 tsp cumin
16 oz kidney beans (I like dark red)
1-2 tbsp cocoa powder

Directions:
In a dutch oven or heavy pan, brown meat and onions. Drain well and wipe out pan. Add all ingredients except for cocoa powder and simmer, covered, for 1 hour. Uncover and simmer for another 15-30 minutes. Add cocoa powder 10 minutes before serving.

Serve with your choice of chili condiments – we like hot sauce, sour cream, cheddar cheese and crushed saltine crackers.

Cornbread is great on the side – either plain or mix in some chopped jalapenos and cheddar cheese.

Read Full Post »