Feeds:
Posts
Comments

Archive for the ‘Vegetable’ Category

Get ready for my first Thanksgiving recipe post! I will be sharing Thanksgiving recipes here and there from now until Turkey Day. I actually made this side dish last year because I wanted to introduce some more inventive recipes to the traditional spread. I was browsing through Epicurious’ top-rated Thanksgiving recipes and found this recipe for Brussels Sprout Hash with Caramelized Shallots from Bon Appetit.

The preparation is a little different than your traditional brussels sprouts recipe. Instead of cooking them whole or halved, you cut them into shreds. I like this because they seem more cabbage-like and visually help those who aren’t so sure about brussels sprouts. The caramelized shallots add so much to this dish and the apple cider really brightens the overall flavor.

I don’t really understand how brussels sprouts got such a bad rap? I was interested in how they’d be received by my family. (Please note that I wrote this post after I made the dish last year. It’s been waiting a whole year to be published!) The verdict? My mom claims she’s still not a fan (oh well). My grandmother, who is a cabbage lover but never liked brussels sprouts because she had only ever tried the frozen ones, decided that she is a fan. My dad and I, who’ve always liked them, enjoyed this recipe. Everyone at the table at least gave them a try so that’s all I could ask.

If you are a brussels sprouts love this is a great preparation variation to try.

One Year Ago: Sausage, Cheese and Basil Lasagna

Brussels Sprouts with Caramelized Shallots
(Recipe source Bon Appetit, November 2007)

Ingredients:

6 tablespoons (3/4 stick) butter, divided
1/2 pound shallots, thinly sliced
Kosher salt
2 tablespoons apple cider vinegar
4 teaspoons sugar
1 1/2 pounds brussels sprouts, trimmed
3 tablespoons extra-virgin olive oil
1 cup water

Directions:

Melt 3 tablespoons butter in medium skillet over medium heat. Add shallots; and sprinkle with kosher salt and pepper. Sauté until soft and golden, about 10 minutes, stirring frequently. Add vinegar and sugar. Stir until brown and glazed, about 3 minutes.

Cut brussels sprouts in half lengthwise. Cut lengthwise into thin (1/8-inch) slices. Heat oil in large skillet over medium high heat. Add sprouts and sprinkle with salt and pepper. Cook until brown at edges, about 6 minutes. Add 1 cup water and 3 tablespoons butter. Sauté until most of water evaporates and sprouts are tender but still bright green, about 3 more minutes. Add shallots and mix to combine.

Yield: 8-10 servings

Read Full Post »

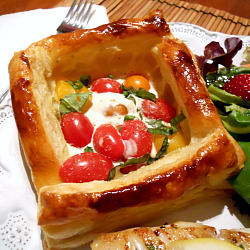
I came across this recipe in the August issue of Cuisine at Home and immediately added it to the following week’s dinner menu. I had a variety of cherry tomatoes from my brother in law’s garden and basil growing in my herb garden. A perfect combination!

These were extremely easy to put together and created a pretty impressive side dish. The flavor was fabulous – what’s not to love about homegrown tomatoes, goat cheese and basil? I went on and on to Brandon at dinner that these would be the perfect thing to make for dinner guests. I also think you could cut the puff pastry a bit smaller for an impressive appetizer. I served my tarts with sautéed grouper and a salad but these could easily be a meatless main course alongside a big salad.

One Year Ago: Summer Corn Dip (this stuff is so addictive! I’m making it for a party this week!)

Tomato Tarts with Goat Cheese and Basil
(Recipe source Cuisine at Home, August 2010)

Ingredients:

2 sheets puff pastry (a frozen 17.3 ounce box)
1 egg yolk beaten with 1 tablespoon water
2 ounces herb flavored goat cheese
2 tablespoons milk
16 cherry tomatoes or varying colors (optional), halved
Salt and pepper to taste
2 tablespoons minced fresh basil

Directions:

Thaw puff pastry according to package directions. Preheat oven to 400 degrees.

Cut one puff pastry sheet into four even squares. Place squares on a parchment lined baking sheet. Cut remaining sheet into eight strips about 3/4 inch wide and then cut the strips in half crosswise (to create 16 total).

Place four strips around the edge of each pastry square, overlapping the corners (see photo above). Lightly brush edges with egg mixture and bake until puffed and brown, 22-24 minutes.

Whisk together goat cheese and milk. Divide cheese mixture among centers of baked tarts, spreading with a spatula and pressing very lightly to slightly deflate the centers. Top cheese mixture with tomatoes and season with salt and pepper.

Return tarts to oven and bake another 5 minutes. Garnish with fresh basil and serve warm or at room temperature.

Yield: 4 tarts

Read Full Post »

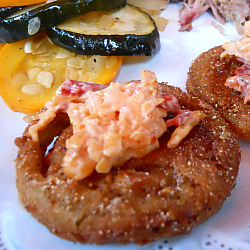
I can’t even tell you how many times Brandon has asked me to make fried green tomatoes. And it’s not that I don’t love fried green tomatoes, I just don’t fry foods at home. I finally caved when Brandon came home with green tomatoes from his brother’s garden and presented me with this recipe from his Garden and Gun magazine. (Note, if you haven’t read Garden and Gun you must pick up a copy. It is a great magazine!)

I decided to go all out and top them with pimento cheese. Fried green tomatoes topped with pimento cheese were one of the passed hors d’oeuvres at our wedding and were a huge hit.

I was really surprised by how easy these were to make. I fried them in my cast iron skillet. It was relatively painless and didn’t leave the house smelling “fried.” I was very pleased with the final result – the tomatoes were perfectly crispy on the outside and had a great texture on the inside. The pimento cheese topping really took them up another notch!

I admit that I am planning on making these again soon for fried green tomato BLT’s and I can’t wait! Take advantage of tomato season and give these a try!

One Year Ago: Tomato Pie (one of my ALL TIME favorites!!!)

Fried Green Tomatoes with Pimento Cheese
(Recipe source Garden and Gun for tomatoes and Bakin’ and Eggs for pimento cheese)

Ingredients:

FOR THE TOMATOES
4 to 6 green tomatoes, sliced
2 cups buttermilk (not fat free)
2 large eggs
2 cups White Lily (self-rising) flour mixed
1 cup stone-ground (medium) cornmeal
1/2 teaspoon garlic powder
1/2 teaspoon onion powder
Generous pinch of salt
Freshly ground black pepper
2 cups canola oil mixed with
1 cup (2 sticks) unsalted butter (I just used canola oil!)

FOR THE PIMENTO CHEESE
2 cups sharp cheddar cheese, shredded
1/2 cup mayonnaise
1/4 cup pimentos (or chopped roasted red peppers)
Pinch cayenne pepper
Salt and pepper, to taste
Pinch garlic powder (if desired)

Directions:

FOR THE TOMATOES
Place sliced tomatoes in colander. Salt lightly, and let sit for about 5 minutes to help draw out moisture. Rinse under cool water and pat dry with paper towels.

Prepare wash by mixing buttermilk and eggs. Prepare dredge by mixing flour, cornmeal, onion powder, garlic powder, salt and pepper.

Working one at a time, completely coat each tomato slice in the wash and then in the dredge, gently shaking off excess.

In a cast-iron skillet over high heat, bring butter and canola oil to 350 degrees (use a candy thermometer). Reduce heat to stabilize. Working a few slices at a time, fry the tomatoes until golden brown, turning only once (about 3 to 4 minutes total). Transfer each batch to drain on brown paper bags or paper towels.

FOR THE PIMENTO CHEESE
Mix together cheese, mayo, pimentos, cayenne, salt, pepper and garlic powder if using. Stir together and refrigerate until ready to serve.

Yield: 4 to 6 first course or side dish servings

Read Full Post »

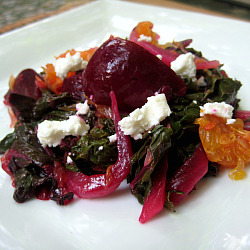
I saw a beautiful bunch of beets with the greens still attached at the farmer’s market this weekend. They were definitely coming home with me. I’ve been wanting to roast beets and experiment with beet greens for a while now. I’ve been so inspired  by everyone’s CSA boxes full of interesting ingredients!

I was searching for a recipe that used both the beets and the greens. I found this Roasted Beet Salad with Oranges and Beet Greens from Bon Appetit on Epicurious and knew it was something I could work with. I made a few modifications to the recipe – I left out the garlic, caramelized the onions, reduced the amount of oil and vinegar in the dressing and added goat cheese. The results were fabulous. I loved this dish and all the flavors in it. The added plus was that it was pretty healthy – the beet greens are loaded with nutrients.

Unfortunately, my husband was not such a big fan. I will honestly say that he tried really hard to like it but he’s just not a fan of beets. Sad for me because I would love to make this again.

And now I have a ton of leftover roasted beets to use! Please let me know if you have any suggestions on favorite beet recipes.

One year ago: Barbecue Chicken Pizza

Roasted Beet Salad with Oranges, Goat Cheese and Beet Greens
(Recipe adapted from Bon Appetit, January 2004)

Ingredients:

6 medium beets with beet greens attached
1 large orange
1 small sweet onion, cut through root end into thin wedges
1/8 cup red wine vinegar (add more, up to 1/3 cup, to taste)
1/8 cup extra-virgin olive oil (add more, up to 1/4 cup, to taste)
1/2 teaspoon grated orange peel
2 ounces goat cheese, crumbled

Directions:

Preheat oven to 400 degrees. Trim greens from beets. Cut off and discard stems. Coarsely chop leaves and reserve. Wrap each beet in foil and place directly on oven rack. Roast until tender when pierced with fork, about 1 hour 30 minutes (mine smaller beets tool about an hour and the larger ones closer to 90 minutes). Cool and peel beets – you might want to wear gloves to avoid staining your hands. Cut each beet into eight wedges and place in a medium bowl.

Cook onions in a heavy skillet (I used cast iron) with olive oil, salt and pepper over medium heat for about 15 minutes, or until golden and soft.

Cook beet greens in large saucepan of boiling water just until tender, about 2 minutes. Drain and cool. Squeeze greens to remove excess water. Add greens to bowl with beets. Peel and remove white pith from oranges. Working over another bowl and using small sharp knife, cut between membranes to release segments. Add orange segments and onion to bowl with beet mixture. Whisk vinegar, oil and orange peel in small bowl to blend and add to beet mixture and toss to coat. Season with salt and pepper. Let stand at room temperature 1 hour (mine only stood for about 20 minutes). Top with crumbled goat cheese and serve.

Yield: 4-6 first course/side dish servings

Read Full Post »

68 Days of Gourmet: Day 61

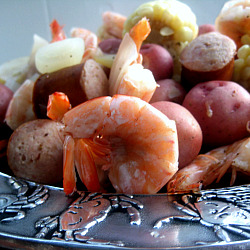
Gourmet named this recipe Spicy Boiled Crabs, Shrimp, Potatoes, Corn and Garlic. I put a Southern spin on it by subbing sausage for the crabs and calling it by its true name, Lowcountry Boil. I think the crabs would have been a fun addition but not in the realm of  possibility for tonight’s dinner.

Lowcountry Boil is a simple, one-pot dinner full of deliciousness. We served it at our rehearsal dinner when we got married in Charleston and requested it for our joint birthday party last year. It’s a great party/entertaining dish but also fun and easy for any night! You can easily scale the amount of ingredients to the number of people you’ll be serving. It’s also easy to control the spice level. If you love spicy foods, feel free to be a little heavy-handed with the seasonings. You cook this in such a big pot that the spices are really diluted.

It’s also relatively healthy and filling. We usually sub chicken or turkey smoked sausage. My favorite way to serve Lowcountry Boil is on a big platter so everyone can pick and choose what they want. And really hot homemade cocktail sauce (the more horseradish, the better!) on the side.

If you’ve never experienced Lowcountry Boil it is a must try this Spring/Summer. Perfect for your next get together – casual, a little messy and fun! I can just picture serving this outdoors with rolls of paper towels and sweet tea in mason jars – what can I say? I was definitely born and raised in the South!

One Year Ago: Easy Spanakopita

Lowcountry Boil
(Recipe adapted from Gourmet, June 1996)

Ingredients:

2 (3-ounce) packets Zatarain’s crab boil or 5 tablespoons Old Bay  seasoning (or more – adjust to taste)
1 tablespoon cayenne (or more adjust to taste)
1/2 cup table salt (might want to reduce to around 1/4 cup)
3 lemons, quartered
2 onions, halved
1 1/2 pounds small potatoes (about 2 inches in diameter)
2 whole heads of garlic (not separated into cloves)
6 ears of corn, shucked and halved
24 ounces smoked sausage (2 packages), cut into 2 inch pieces
2 tablespoons Old Bay Seasoning, or to taste, for sprinkling over  boiled seafood
3 pounds large shrimp (about 30, preferably with heads)

Directions:

In a very large stock pot or kettle (7- to 8-gallons) bring 5 gallons water to a boil.

Add Zatarain’s crab boil or 5 tablespoons Old Bay seasoning, cayenne, salt, lemons and onions to boiling water and boil 5 minutes. Add potatoes and garlic and boil for about 10 minutes. Add corn and sausage and cook for about 5-10 more minutes, until corn and potatoes are tender.

Add shrimp and cook until they turn bright pink, about 2-3 minutes, careful not to overcook. Drain pot and transfer to a platter. Sprinkle with Old Bay seasoning and serve with cocktail sauce.

Yield: 6 servings

Read Full Post »

68 Days of Gourmet: Day 60

I wanted to include a couple more vegetable/side/meatless dishes in the 68 Days of Gourmet project. I flipped through The Gourmet Cookbook vegetable dishes and Peas with Spinach and Shallots looked like a great choice for Spring. It took less than 15 minutes to put together, was a nice change from plain peas or spinach and looked pretty on the plate. I find myself repeating the same sides over and over so it was good to try something new that was so easy and manageable on a weeknight!

One Year Ago: Grilled Sweet Potato Slices

Peas with Spinach and Shallots
(Recipe source The Gourmet Cookbook, published in Gourmet January 2002)

Ingredients:

2 medium shallots, thinly sliced
2 garlic cloves, thinly sliced
1 tablespoon vegetable oil
1 tablespoon unsalted butter
10 ounces frozen peas
1/4 cup water
5 ounces baby spinach
3/4 teaspoon salt
1/4 teaspoon black pepper

Directions:

Heat a 12-inch nonstick skillet over medium heat. Add oil and butter and heat. Add shallots and garlic and cook, stirring frequently, until soft 3-6 minutes.

Stir in peas and water and cook, covered, stirring occasionally, until peas are tender, about 5 minutes. (Note that you might want to start with a little less water and add more if necessary.)

Stir in spinach, salt and pepper and cook, tossing, until spinach is just wilted, about 1 minute.

Yield: 4 servings

Read Full Post »

68 Days of Gourmet: Day 56

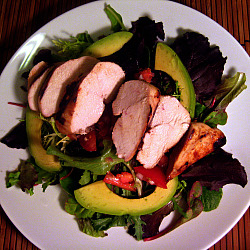
A dinner salad was a must on this week’s menu. The temperatures have been in the 80s and the days are getting longer and longer. A perfect reason to enjoy a cool, flavorful salad with grilled chicken. I browsed through the grilled chicken salad recipes from Gourmet on Epicurious and this salad was the standout.

It was super easy to prepare – the chicken only has to marinate for 15 minutes and while it’s grilling you can prepare the tomato mixture and plate the salad. This salad is a great healthy and quick option for a weeknight dinner.

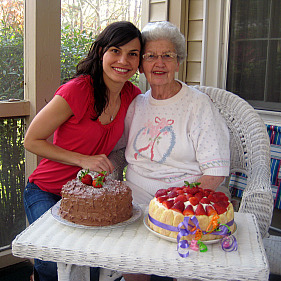
Our Easter weekend was awesome! We celebrated my grandmother’s 80th birthday (say happy birthday to Mema – she reads the blog!!!) and cooked up a storm. I baked my favorite Lady Strawberry Cake and the crowd pleasing Chocolate Cake with Chocolate Cream Cheese Frosting. I can’t resist sharing this picture of Mema with her TWO birthday cakes!

I’m teaching FOUR BodyPump classes this week. I predict that I will be sore by the time Sunday rolls around. We’re teaching the new release and it’s really tough – the squats and lunges make me want to cry! And I have some news for you guys…I am going to register for the Marine Corps Marathon tomorrow. I’m so nervous to commit to a race that is 6  months out but it’s a big goal of mine to run a big city marathon and I’ve heard great things about this race. I’ll start slowly building my base in the coming months and really ramp up my training in July. Ahh! I can’t believe I’m 100% committing to another marathon.

And now salad!

One Year Ago: Chocolate Peanut Butter Tart (YUM!)

Grilled Chicken Salad
(Recipe source Gourmet, August 2005)

Ingredients:

1/2 cup fresh lime juice
1 tablespoon mild honey
1/2 teaspoon dried hot red pepper flakes
2 1/4 teaspoons salt
1 cup olive oil
6 chicken breast halves with skin and bones (3 pounds total) – I used 2 boneless skinless breasts and halved the lime vinaigrette
2 large tomatoes, cut into 1/2-inch pieces (2 cups)
2 medium shallots, halved lengthwise and thinly sliced crosswise (1/2 cup)
8 ounces mesclun, thinly sliced (6 cups) – I used baby greens
1 cup loosely packed fresh basil leaves, thinly sliced – omitted because the store was out of basil – so disappointing 😦
Sliced avocado (if desired – I added this)

Directions:

PREPARE THE CHICKEN AND SALAD
Whisk together lime juice, honey, red pepper flakes and 3/4 teaspoon salt in a large bowl. Add oil in a slow stream, whisking.

Transfer chicken to a 1-gallon sealable plastic bag and add 1/3 cup lime vinaigrette, then seal bag. Marinate chicken at room temperature 15 minutes.

Transfer another 1/3 cup lime vinaigrette to a bowl, stir in tomatoes and shallots, and marinate until chicken is finished cooking. Transfer another 1/3 cup lime vinaigrette to a large bowl and set aside for cooked chicken.

Remove chicken from bag, discarding marinade, and sprinkle all over with remaining 1 1/2 teaspoons salt.

TO COOK CHICKEN ON A CHARCOAL GRILL
Open vents on bottom of grill and on lid. Light a large chimney starter of charcoal briquettes (80 to 100) and pour them evenly over 1 side of bottom rack (you will have a double or triple layer of briquettes).

When charcoal turns grayish white (after 15 to 20 minutes) and you can hold your hand 5 inches above rack for 3 to 4 seconds, sear chicken breasts, starting with skin sides down, on a lightly oiled rack over coals, uncovered, turning once, until well browned, 5 to 6 minutes total.

Move browned chicken breasts to side of grill with no coals and cook, covered with lid, turning over occasionally, until just cooked through, 12 to 15 minutes more.

TO COOK CHICKEN USING A GAS GRLL
Preheat all burners on high, covered, 10 minutes, then adjust heat to medium high heat.

Sear chicken on lightly oiled grill rack, lid down, until well browned, about 3 minutes per side.

Turn off 1 burner (middle burner if there are 3) and arrange all seared chicken on rack above shut-off burner. Cook seared chicken, covered with lid, turning over once, until just cooked through, 10 to 15 minutes. Internal temperature should be 160 degrees.

TOSS GRILLED CHICKEN IN VINAIGRETTE
Transfer hot grilled chicken to large bowl with lime vinaigrette and turn to coat. Leave in bowl 5 minutes, then transfer to a platter and loosely cover with foil.

ASSEMBLE SALAD
Toss together mesclun, basil, tomato mixture and salt to taste. Slice chicken and arrange over salad. Drizzle with some lime vinaigrette and serve.

Yield: 6 servings

*Note: I used 2 boneless skinless chicken breasts and cut the lime vinaigrette in half.

Read Full Post »

68 Days of Gourmet: Day 53

I didn’t get a great photo of this salad…it was late and dark and we were hungry…but it’s really delicious. I don’t think a salad can get any better than warm melty goat cheese atop a bed of baby greens with a simple vinaigrette. The warm goat cheese rounds are so easy to make and definitely worth the extra effort. This salad is an easy way to kick up a date night or company dinner another notch!

After our late night Sunday (we didn’t get home until 3:45 a.m.!), it’s taken a while to get caught up this week. I decided to take Monday as a rest day in an effort not to push my tired body too hard. I ran a quick 1.5 mile sprint on the treadmill and taught BodyPump on Tuesday. I went suuuppperrr heavy on my weights and as a result my lower body is really sore! Sometimes it just feels good to push it! This morning I went to a hot vinyasa yoga class before work and took Sullie for a 3 mile jog after work. The weather was beautiful. I think it was 75 degrees today. I can’t wait until this weather is here to stay. I am so much more motivated to run when the days are longer and the weather is nice.

Let’s talk quickly about early morning yoga classes. When I first started practicing, morning classes were a huge struggle. My balance was off and my focus just wasn’t there. Over time, I have become more accustomed to practicing in the morning and I can’t believe the difference in my energy level when I get a good class in before work. I don’t know if it’s the backbends or what but I feel so great and energetic for the rest of the day. And I can compare this to the mornings I teach BodyPump – completely different energy levels. So that’s my interesting tidbit for the day!

Also, just wanted to throw out to you guys that I am ALWAYS open to feedback and suggestions. Please let me know how you’re feeling about the new fitness spin in the posts. I’m still figuring out how I really want to blog about fitness and nutrition – I don’t know if it will be an evolution of this blog or a new blog? Let me know your thoughts!

And one more note…I have 12 recipes left to make for 68 Days of Gourmet and I’m looking for inspiration! Leave a comment or send me an email at bakinandeggs (at) gmail (dot) com if you have suggestions or something you’d like to see. It would be most appreciated 🙂

One Year Ago: Indian Spiced Chicken Burgers (still one of our favorites – we love this dinner!)

Baby Greens with Warm Goat Cheese
(Recipe source The Gourmet Cookbook, published in Gourmet January 2002)

Ingredients:

1 large egg white
2 teaspoon water
4-6 (1/3-inch-thick) rounds soft mild goat cheese, cut from a cold log (use dental floss for easy cutting)
1/3 cup dry bread crumbs (preferably Japanese panko)
2 teaspoon cider vinegar
1/4 teaspoon salt
1/4 teaspoon Dijon mustard
Pinch of sugar
3 tablespoons extra-virgin olive oil, divided
4 cups mesclun (mixed baby salad greens – about 2 ounces)

Directions:

Whisk together egg white and water. Dip cheese rounds in egg, letting excess drip off, then dredge in bread crumbs, pressing lightly to adhere. Chill 15 minutes.

Whisk together vinegar, salt, mustard, sugar and a pinch of pepper in a small salad bowl. Add 2 tablespoon oil in a slow stream, whisking until emulsified.

Heat remaining tablespoon oil in a small nonstick skillet over medium-high heat until hot but not smoking, then sauté cheese until golden, about 30 seconds per side. Remove cheese rounds from pan.

Add greens to dressing and toss gently to coat. Top with warm goat cheese rounds.

Yield: 2 servings

Read Full Post »

Just a quick post to wish you all Happy St. Patrick’s Day and share our dinner with you. We celebrated St. Patrick’s Day one day early because Brandon won’t be home for dinner tomorrow night. I made corned beef, cabbage, potatoes and soda bread. For some reason, I’ve always been a huge corned beef fan and asked for this dinner all the time when I was growing up!

Due to time constraints, I had to make the corned beef in the crockpot. I was leery that it would dry out but it actually turned out pretty well. I think I’ll still prefer boiling it in the future but this worked for a weeknight dinner. I cooked the vegetables and potatoes separately using some of the cooking water for the corned beef when I got home. The cabbage wouldn’t have fit in the crock pot and I knew it would be complete mush if I let it cook all day.

This was my first time making soda bread and we really enjoyed it. It was super simple to make and tasted great. A nice accompaniment to an Irish feast! I opted to use a very basic soda bread recipe – we weren’t interested in caraway seeds and golden raisins. I would describe it as a cross between a biscuit, scone and bread. I enjoyed a slice with butter and jam after dinner!

Corned beef and cabbage will always remain one of my all-time favorite dinners! We can’t wait to enjoy the leftovers.

One Year Ago: Simple Broiled Mahi

Corned Beef and Cabbage
(Recipe source Bakin’ and Eggs)

Ingredients:

1 package corned beef with seasoning packet
2 cloves garlic, smashed
1 bay leaf
Enough water to cover
1 small head cabbage
Baby carrots (if desired)
Medium-sized red potatoes

Directions:

Place corned beef in a slow cooker with seasoning packet, garlic cloves and bay leaf. Add water until barely covered. Cook on low for about 6 hours, until fork tender.

Cut cabbage into quarters and place in a large stockpot with potatoes and carrots (if using). Add some of the water from the corned beef plus enough fresh water to cover. Bring to a simmer and cook for about 45 minutes, until cabbage and potatoes are tender.

Basic Irish Soda Bread
(Recipe source Bon Appetit)

Ingredients:

3 1/2 cups all purpose flour (I used 1 1/2 cups whole wheat and 2 cups of white)
1 teaspoon baking-soda
3/4 teaspoon salt (I used 1 teaspoon)
1 1/2 cups buttermilk, plus a couple more tablespoons if necessary

Preheat oven to 425 degrees. Lightly flour a baking sheet.
Whisk together flour, baking soda and salt in large bowl. Mix in enough buttermilk to form moist clumps. Gather dough into ball and turn out onto lightly flour surfaced.  Knead just until dough holds together, about 1 minute. Shape dough into 6-inch by 2-inch-high round. Place on prepared baking sheet and cut a 1-inch-deep X across top of bread, extending almost to edges. Bake until bread is golden brown and sounds hollow when tapped on bottom, 30-35 minutes. Transfer bread to rack and cool completely.

Read Full Post »

68 Days of Gourmet: Day 51

Part two of our Greek feast – check out my homemade pita bread here. This dinner has been on the list since I first began researching recipes for 68 Days of Gourmet. I thought Kefta and Zucchini Kebabs with homemade tzatziki sounded great. Unfortunately, the kebab thing was not happening! I tried to putting these meatballs on skewers but immediately knew that there was no way they would stay on the skewer. They were falling off. I made a game time decision to cook them inside in a skillet and all was well and tasty with no grilling disasters!

I think one of the biggest milestones you make as a home cook is the ability to deal with situations in the kitchen that don’t go as planned. I had a lot going on in the kitchen – homemade pita bread, making tzatziki, assembling the meatballs and marinating the zucchini. It would have been easy for me to get frustrated and give up on the dinner but I just decided to make the best of it and cook the meatballs and zucchini on the stove top instead. I made a different kefta recipe last year using this method so I knew it would work out.

I don’t blame the recipe for my meatballs not coming together. I forgot to buy pine nuts for the meatballs and don’t know if they might have been a detrimental part of the binding. Regardless, this turned out to be a great dinner. We stuffed our pitas with the keftas and taziki and ate the zucchini on the side. Brandon enjoyed the leftovers in pita sandwiches for lunch.

Quick update on fitness recently. 10 workouts in the last 8 days – all yoga, running (!!!) and teaching BodyPump. Overall, I’ve been feeling great but kind of hit a wall today. I’m a big fan of the time change – love having daylight when I get home to run and hang out outside – but it was really tough getting up at 5 to teach BodyPump this morning. I felt so out of it and exhausted all day. Decided just to relax on the couch, catch up with the DVR and make homemade pizza this evening after work. Exactly what I needed. Sometimes you just need to listen to your body and rest!

One Year Ago: Tomato, Fresh Mozzarella and Basil Salad

Kefta and Zucchini Kebabs
(Recipe adapted from Gourmet, January 2006 – originally published in 1980)

Ingredients:

FOR THE TZATZIKI SAUCE
1 cup plain yogurt
2 tablespoons chopped fresh mint (I subbed parsley)
1 teaspoon minced garlic
1/2 teaspoon salt
Squeeze of fresh lemon juice

FOR THE ZUCCHINI
3 tablespoons fresh lemon juice
1 teaspoon sugar
1/4 teaspoon salt
1/4 teaspoon black pepper
1/3 cup olive oil
2 medium zucchini (around 1 pound), cut crosswise into 1/2-inch-thick slices

FOR LAMB MEATBALLS (KEFTA)
2 slices firm white sandwich bread, torn into small pieces
1 small onion, finely chopped (about 1 cup)
1/4 cup loosely packed fresh parsley leaves
1/4 cup loosely packed fresh cilantro leaves (omitted, I just increased the parsley)
1 pound ground lamb
1 teaspoon salt
1/2 teaspoon ground allspice
1/2 teaspoon cayenne
1/4 teaspoon cinnamon
1/4 teaspoon black pepper
1/3 cup pine nuts, toasted and finely chopped (omitted because I forgot to buy them!)

12 (10-inch) wooden skewers, soaked for 30 minutes

Directions:

FOR THE TZATZIKI SAUCE
Stir together yogurt, mint/parsley, garlic and salt in a small bowl and chill.

FOR THE ZUCCHINI
Whisk together lemon juice, sugar, salt, pepper and oil in a large bowl and stir in zucchini slices. Marinate at room temperature while making meatballs.

FOR THE KEFTA
Cover bread with water in a bowl and soak 10 minutes. Squeeze handfuls of bread to remove as much excess water as possible and transfer to a bowl.

Pulse onion and herbs in a food processor until finely chopped. Add mixture to bread along with lamb, salt, spices and pine nuts. Mix with your hands until well blended. Form lamb mixture into 36 balls (about 1 tablespoon each).

TO ASSEMBLE
Prepare grill for cooking over medium-hot charcoal (medium heat for gas). Thread 6 meatballs, 1/4 inch apart onto each of 6 skewers.

Thread zucchini lengthwise onto remaining 6 skewers (5 slices per skewer). Cut sides should be on grill, leaving 1/4 inch between slices. Grill zucchini and lamb on oiled grill rack, turning over once, until golden and just cooked through, 4 to 6 minutes. Serve warm with yogurt sauce.

Alternatively, saute zucchini and meatballs over medium heat on the stove top (in separate skillets) until cooked through, 6-8 minutes.

Yield: 4-6 servings

Read Full Post »

Older Posts »