Feeds:
Posts
Comments

Posts Tagged ‘summer dessert’

I am loving peach season this year. The South Carolina peaches that we are getting in Charlotte seem extra sweet and have the perfect texture. As a result, there has been an endless supply of peaches in our house. I just can’t stop buying them because I know the season will be over soon.

I made a peach cobbler a few weeks ago and have been eating peaches plain, with yogurt and in my oatmeal. I was thinking of new ways to serve the peaches and remembered that I’ve been wanting to try them grilled. I added them to the dinner menu one night when we were planning on grilling pork tenderloin. My original plan was to serve them alongside the pork but Brandon convinced me to have them for dessert topped with ice cream instead. I have a really hard time saying no to the idea of topping anything with ice cream! 😉

We really enjoyed the grilled peaches. The brown sugar and cinnamon caramelize on the peaches and they get a very slight smoke flavor. This recipe would be a perfect side item or dessert.I will definitely be asking Brandon to throw some peaches on the grill again before peach season ends!

One Year Ago: Blueberry Peach Crisp

Grilled Cinnamon and Brown Sugar Glazed Peaches
(Recipe source Bakin’ and Eggs)

Ingredients:

2 peaches
2 tablespoons vegetable oil
2 tablespoons brown sugar
1 teaspoon cinnamon

Directions:

Preheat grill to medium. Cut peaches in half, twist to separate and remove the pit. Mix together brown sugar and cinnamon and set aside. Brush peach halves with vegetable oil and grill (cut sides down) for 3-4 minutes with the lid down. Flip peaches over so that cut side is exposed and sprinkle with brown sugar/cinnamon mixture. Grill for another 3-4 minutes, lid down, until brown sugar mixture has caramelized.

Serve as is or top with ice cream and sprinkle with more brown sugar.

Yield: 2 servings

Read Full Post »

Cobblers and crisps are the highlight of summer desserts for me. I love that so much fresh fruit is available,  that you can mix and match fruits based on what you have on hand and I love how easy they are to prepare. If I had to pick a favorite, it would definitely be peach cobbler. After all, I did grow up in Georgia!

The farmer’s markets here have been overflowing with South Carolina peaches. After a few weeks of eating peaches plain, with yogurt and on oatmeal, I developed quite a craving for peach cobbler with ice cream. I prefer cobblers with a biscuit topping rather than the pie crust topping and this recipe from Southern Living looked perfect for my peach cobbler craving.

It was very easy to assemble (like the name implies) and the most time intensive part of the whole process was peeling and slicing the peaches. I halved the original recipe because it would be trouble if we had a whole batch in the house! The half recipe was perfect for about five servings.

This peach cobbler was wonderful served warm with a generous scoop of vanilla ice cream! I will be keeping this recipe on hand for when I need a quick cobbler fix!

One Year Ago: Grilled Fig and Prosciutto Pizza
Another Favorite Peach Dessert: Blueberry Peach Crisp

Easy Peach Cobbler
(Recipe source Southern Living)

Ingredients:

1/2 cup unsalted butter
1 cup all-purpose flour
2 cups sugar, divided
1 tablespoon baking powder
Pinch of salt
1 cup milk
4 cups fresh peach slices
1 tablespoon lemon juice
Ground cinnamon or nutmeg (optional)

Directions:

Preheat oven to 375 degrees.

Melt butter and pour into a 13- x 9-inch baking dish.

Combine flour, 1 cup sugar, baking powder and salt. Add milk, stirring just until dry ingredients are moistened. Pour batter over butter (do not stir).

Bring remaining 1 cup sugar (I reduced this a bit – used more like 3/4 cup), peach slices and lemon juice to a boil over high heat, stirring constantly. Pour over batter (do not stir). Sprinkle with cinnamon and nutmeg if desired.

Bake at 375 degrees for 40 to 45 minutes or until golden brown. Serve cobbler warm with ice cream.

Yield: 10 servings

Read Full Post »

68 Days of Gourmet: Day 66

North Carolina strawberries just came into season and Brandon sweetly picked up a flat for me at the farmer’s market last week. Strawberry is my favorite flavor of ice cream and ever since I received the KitchenAid ice cream maker attachment last Christmas, I’ve enjoyed trying homemade ice cream recipes. I was thrilled to see that Gourmet had several no-cook strawberry ice cream recipes.

We had friends in town visiting last weekend and I thought this Strawberry Cheesecake Ice Cream would be the perfect dessert for our cookout Friday night. It was so easy to put together since it didn’t require any cooking. You just throw all the ingredients in a blender then into the ice cream maker to freeze. I made it on my lunch break the day I served it. Not surprisingly, the ice cream was a hit. Who doesn’t love homemade ice cream?

One year ago: Baked Eggplant Parmesan, Mississippi Mud Pie

No Cook Strawberry Cheesecake Ice Cream
(Recipe source Gourmet, July 2000)

Ingredients:

3/4 pound (1 quart) strawberries, chopped
8 ounces softened cream cheese
3/4 cup sugar
1 cup milk
1 tablespoon fresh lemon juice
Pinch of salt
1/2 cup heavy cream

Directions:

Place strawberries, cream cheese, sugar, milk, lemon juice and salt in a blender. Blend until just incorporated. Stir in the heavy cream and chill. Follow the directions on your ice cream maker to freeze ice cream.

For the KitchenAid I slowly added the chilled ice cream base and mixed on the lowest speed for about 15 minutes, until the ice cream was the consistency of soft serve. Place in an airtight container and put in freezer to freeze completely.

Note, you may want to take the ice cream out to soften 10-15 minutes before serving.

Yield: about 8 servings

And I can’t resist sharing this picture that shows you how good the ice cream base tasted but I won’t reveal how much unfrozen ice cream I ate!

Read Full Post »

icecreamsundaepie

Brandon had been asking for and ice cream pie. I was tempted to make my standby, cookies and cream with an Oreo crust, but decided to look around to see if anything else caught my eye. I saw this Malt Shop Ice Cream Pie on myrecipes.com and thought with a few modifications it would be a winning combination. One of Brandon’s all time favorite desserts is a chocolate malt so I knew he would love this pie.

I think what sold me on it the most was the sugar cone crust. What a fun idea! The crust didn’t really hold together well but I think if I had crushed the cones a little finer I wouldn’t have had that problem. I substituted the strawberry ice cream in the Cooking Light recipe for chocolate and made my own fudge sauce to go in between layers and on top.

I’ll definitely be making this pie again but next time I’ll add more malt powder to get a stronger malt flavor. I think this would be great to serve to dinner guests topped with a cherry!

icecreamsundaewholepie

Malted Ice Cream Sundae Pie
(Recipe adapted from Cooking Light)

Ingredients:

2 tablespoons  honey
2 tablespoons  butter, melted
12 sugar cones, crushed
2 cups low-fat chocolate ice cream, softened
1/4 cup malted milk powder, divided
1/2 cup  hot fudge topping, plus more for topping
2  cups low-fat vanilla ice cream, softened
Canned whipped cream

Directions:

Combine crushed sugar cones, honey and butter in a medium bowl and stir well to combine. Press mixture into the bottom and up the sides of a 9-inch pie plate. Freeze for 30 minutes or until firm.

Place softened chocolate ice cream and 2 tablespoons of malted milk powder in a bowl. Beat with a mixer at high speed until smooth and creamy. Spread mixture evenly into crust and spread hot fudge over the ice cream. Freeze 30 minutes or until firm.

Place softened vanilla ice cream and remaining 2 tablespoons of malted milk powder in a bowl. Beat with a mixer at hight speed until smooth and creamy. Spread mixture evenly over first 2 layers.

Cover and freeze 4 hours or until firm. Top with hot fudge and whipped cream just before serving.

Yield: 8 servings

Read Full Post »

blueberrypeachcrisp

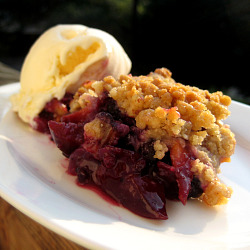
Some of you might remember that Brandon and I recently moved to Charlotte, North Carolina from Birmingham, Alabama. One of the things we were looking forward to most about the move to Charlotte was being close to great outdoor activities. Last weekend we decided to head to the Pisgah National Forest to hike and camp.

jensulmountain

We were extremely pleased to discover that it’s blueberry season in the mountains and the trail we hiked was FULL of blueberry bushes. You would not believe the amount of blueberries we saw – mountains full! We snacked on blueberries on our hike in and out from our campsite and picked two gallon bags full to take home. It was totally worth the extra weight in our packs!

brandonmountain

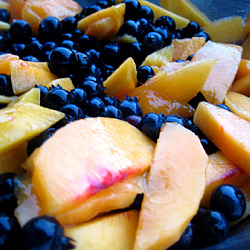
So despite being tired from the weekend on Sunday night, I was eager to bake something with my blueberries. I had been planning on making a peach cobbler and had some peaches in the fridge. I was looking for blueberry peach cobbler recipes online when Brandon mentioned he preferred cobbler with “crunchy topping.” I informed him he had a crisp in mind and began looking for crisp recipes. I saw this recipe on Use Real Butter and knew I would look no further.

It was awesome. The flavor of the blueberries really shined and the pecans added just the right nutty taste. You don’t toast them before adding them to the crisp topping but they get a great toasted flavor as they bake. With a scoop of ice cream, this is a heavenly dessert!

Blueberry Peach Crisp
(Recipe source Use Real Butter, originally from Fine Cooking)

Ingredients:

2 ounces (1/2 stick) unsalted butter, softened – plus more for greasing pan
3 ounces all purpose flour (this is a little shy of 3/4 cup)
1/2 cup light brown sugar, packed
1/2 teaspoons cinnamon
1/4 teaspoon salt, divided
2/3 cup pecans, coarsely chopped
3 cups (about 1 pound) blueberries, rinsed and picked through
3 medium peaches (about 1 pound), peeled and sliced about 1/2 inch thick
1/4 cup sugar
3 tablespoons cornstarch
1/8 teaspoon ground nutmeg

Directions:

Preheat oven to 375 degrees. Butter a 9-inch square pan, or a comparable size baking pan (I used an oval baker).

To make the topping, mix together flour, brown sugar, pecans, cinnamon and 1/8 teaspoon salt. Work butter into the mixture until clumpy.

For the fruit, mix together blueberries, peaches, sugar, cornstarch and nutmeg. Pour into prepared pan and spread evenly.

Sprinkle topping over fruit and bake for about 40 minutes, or until topping is lightly browned. Serve warm with ice cream.

Yield: 6 servings

blueberriesandpeaches250

Read Full Post »

figupsidedown

I really wanted to bake something with the figs that I picked on Monday (see my fig pickin’ story and my Grilled Pizza with Fresh Figs, Prosciutto, Caramelized Onions and Blue Cheese here). I was not in the mood for a pie or tart and kind of had my heart set on baking some sort of cake so I Googled “fresh fig cake.” Surprisingly, there is not an abundance of fig cake recipes but I did find one Fig Upside Down Cake that sounded like just what I had in mind.

This cake was very simple to put together and so delicious warm out of the oven with a scoop of ice cream. The “upside down” topping of brown sugar, butter and honey caramelizes with the figs to create a caramelized fig preserves type flavor. The cake is moist and buttery and still tasted great the second day warmed up a little.

Fig Upside Down Cake
(Recipe source nola.com)

Ingredients:

12 tablespoons (1 1/4 sticks) unsalted butter, divided
1/2 cup packed light brown sugar
2 tablespoons honey
10 fresh figs, stems removed, cut in half (I needed more like 15)
1 1/2 cups all-purpose flour
1 1/2 teaspoons baking powder
1/4 teaspoon kosher salt
3/4 cup sugar
1 teaspoon vanilla
2 large eggs
1/2 cup whole milk

Directions:

Preheat oven to 350 degrees. Butter a 9-inch cake pan with 2-inch sides (I used an 8-inch pan and it worked fin). Line the bottom of the pan with parchment paper and butter the parchment.

Melt 4 tablespoons of the butter in the microwave. Stir in the brown sugar and honey until smooth. Pour the sauce into the prepared cake pan. Arrange figs, cut sides down, in concentric circles over the sauce. Set aside.

Whisk together flour, baking powder and salt and set aside. In the bowl of a stand mixer or with an electric mixer, beat the remaining 8 tablespoons butter with sugar and vanilla until lightened in color and texture, about 2 to 3 minutes. Add eggs 1 at a time, beating until well combined after each. Turn mixer to low speed and add dry ingredients and milk in 3 parts, beginning and ending with flour. Spoon the batter evenly over the figs.

Bake until golden and a skewer inserted in the center comes out clean, 45 to 55 minutes (mine only took 45 so start checking early). Transfer the cake to a rack and cool in the pan for at least 30 minutes.

Run a knife around the sides of the pan to loosen the cake. Place a serving platter on top of the pan and invert the cake. Gently lift off the pan and remove the parchment paper. Serve warm. Extra delicious with ice cream.

Read Full Post »

coconutlimecake

My mother in law’s birthday was last week and of course I volunteered to bring the birthday cake to our dinner party.  I love making cakes but it doesn’t make a lot of sense to make a whole cake for just Brandon and me.

I wanted to make a summery flavored cake. We have coconut and key lime lovers in the family so I decided that a coconut cake with a lime curd filling would be just the thing.

I used a Paula Deen recipe for the cake and frosting and adapted a lemon curd recipe from my blog for the lime filling. I must say that I was especially impressed by the Seven Minute Frosting for this cake. I had never made this type of frosting before and it was a nice change to my usual buttercream or cream cheese frosting. Brandon and I both thought it was reminiscent to marshmallow fluff, in a good way!

I was pleased with the way this cake turned out and it got good reviews at the party. I think my mother in law was also thrilled to be the guest of honor instead of the party planner.

Coconut Cake with Lime Curd Filling
(Recipe sources: cake and frosting – Paula Deen, lime curd filling – adapted from this lemon curd on my blog)

Ingredients:

FOR THE CAKE
2 sticks unsalted butter, at room temperature
2 cups sugar
4 eggs, at room temperature
3 cups self rising flour, sifted
1 cup coconut milk, stirred (not lite)
1 teaspoon vanilla

FOR THE LIME CURD
2 large eggs
1/2 cup sugar
3 tablespoons fresh lime juice (juice of about 2 limes)
1/4 cup (1/2 stick) unsalted butter
1 1/2 teaspoons grated lime peel

FOR THE FROSTING
1 1/2 cups sugar
1/4 teaspoon cream of tartar
1/8 teaspoon salt
1/3  cup water
2 egg whites
1 1/2 teaspoons vanilla
2 cups sweetened shredded coconut

Directions:

FOR THE CAKE

Preheat oven to 350 degrees. Grease and flour 3 (8-inch) cake pans. (I used the butter wrappers from the cake to grease the pans)

In the bowl of a stand mixer, cream butter on medium speed until fluffy. Add sugar and continue to cream for 6 to 8 minutes, until mixture is fluffy and lightened in color. Add eggs one at a time and beat well after each addition. Add flour and coconut milk alternately, beginning and ending with flour. Add vanilla and beat until just mixed.

Divide batter equally among prepared pans (about 2 cups per pan). Level batter in each pan by holding pan a few inches above counter, then dropping it flat onto counter. Do this several times to release air bubbles and create a more level cake.

Bake for 25 to 30 minutes or until done. Start checking cakes at around 22 minutes. Cool in pans for 5 to 10 minutes before inverting cakes onto cooling racks to cool completely.

FOR THE LIME CURD
Whisk eggs, sugar and lime juice in heavy small saucepan. Add butter and lime peel. Stir over medium-low heat until curd thickens to pudding consistency, about 8 minutes. DO NOT LET MIXTURE BOIL – it will curdle (trust me, I had to throw a batch out!) Transfer to small bowl. Press plastic wrap onto surface of curd and chill at least 2 hours.

FOR THE FROSTING
Place sugar, cream of tartar, salt, water and egg whites in the top of a double boiler. Using a hand held mixer, beat mixture for about a minute on high speed. Place pan over boiling water and make sure that the boiling water does not touch the bottom of the top pan. Beat constantly on high speed with for 7 minutes. Beat in vanilla at the end and combine well.

TO ASSEMBLE THE CAKE
Place the bottom layer on a plate or cake stand. Spread top with half of the lime curd, leaving about a 1/2 inch border around the edges. Place second layer on top of the first and spread the remaining lime curd over the top. Place third layer on top of second and frost top and sides with frosting. Press coconut into the top and sides of frosting.

Read Full Post »

cherrycobbler250

Tonight was the last night of my visit with my grandmother. Unfortunately, I have to head back to Charlotte tomorrow and rejoin the working world. I’ve definitely enjoyed my week off of work. My dad bought some great looking Bing Cherries at the Dekalb Farmers Market last weekend. He loves all things cherry so I decided to treat everyone to fresh cherry cobbler tonight.

I really love making fruit cobblers. They are a breeze to throw together and a great way to showcase summer fruits. I thought this cobbler had just the right ratio of fruit to dough (my biggest cobbler pet peeve is too much dough) and had just the right balance of tart and sweet. The topping is biscuity, which I prefer, and has just a hint of cinnamon.

If you are a cherry lover, this cobbler is a must try!

Fresh Cherry Cobbler
(Recipe adapted from Emeril Lagasse)

Ingredients:

FOR THE FILLING:
5 cups Bing cherries, pitted
1 cup sugar
1/4 cup water
3-4 teaspoons cornstarch

FOR THE TOPPING:
1 cup all-purpose flour
1/4 cup sugar
2 tablespoons brown sugar
1 teaspoon baking powder
1/2 teaspoon cinnamon
3 tablespoons cold butter
1 egg, lightly beaten
3 tablespoons milk

Directions:

Preheat oven to 400 degrees. Prepare an 8 x 8 pan with cooking spray.

Mix together cherry filling ingredients in a medium saucepan. Heat over medium-high heat until mixture is bubbling and thickened, about 5 to 7 minutes. Stir frequently. Start with 3 teaspoons of cornstarch and add extra teaspoon if necessary. Pour filling into prepared pan.

In the meantime, mix together flour, sugars, baking powder and cinnamon. Cut in butter until mixture resembles coarse crumbs. In a separate bowl, combine egg and milk. Stir into flour mixture until just combined.

Top cherry filling with tablespoons of dough. You should have about three rows of three dough dollops. Bake for 20-25 minutes, or until topping is golden in color.

Serve with ice cream.

Yield: 6-8 servings

cherrycobblerpan

Read Full Post »

strawberrytartfgts

Our friends Cristen and Graham just welcomed a beautiful baby girl into this world. After a couple weeks at home adjusting to the crazy life of being new parents, they were ready to get out of the house! We invited them over for a casual evening with make your own pizza. I put together some fun toppings and everyone made their own pizza. I think it was just the thing they needed to relax a bit. Baby Camille was on her best behavior and slept pretty much the whole time. We hardly heard a peep.

I wanted to make a lighter dessert that would be nice after pizza. I knew Cristen loved lemon-flavored desserts and I’d had my eye on some strawberry tart recipes for the last month or so. I decided to combine the two and it worked out perfectly.

I think my favorite part of this dessert was the crust. It was so good! It is definitely going to become my standard sweet tart dough recipe. If I made this again I would probably make an extra half batch of the lemon curd to fill the tart pan a little more. Don’t be intimidated by all of the steps. It’s really easy to put together if you make the curd and crust the night before you want to serve it.

Strawberry Lemon Tart
(Recipe source Smitten Kitchen – tart dough, Williams Sonoma – tart dough mixing method, epicurious.com – lemon curd)

Ingredients:

FOR THE TART DOUGH
1 1/2 cups all-purpose flour
1/2 cup confectioner’s sugar
1/4 teaspoon salt
1 stick plus 1 tablespoon (9 tablespoons) very cold (or frozen) unsalted butter, cut into small pieces
1 large egg

FOR THE LEMON CURD
2 large eggs
1/2 cup sugar
3 tablespoons fresh lemon juice
1/4 cup (1/2 stick) unsalted butter
1 1/2 teaspoons grated lemon peel

GARNISH
Fresh strawberries, stems removed and sliced in half
1/4 cup strawberry jam

Directions:

FOR THE TART DOUGH
Fit a stand mixer with the paddle attachment. Stir together flour, sugar and salt in mixer bowl. Add the butter and beat on medium-low speed until the texture resembles coarse cornmeal (should be between the size of oatmeal flakes and peas). Add the egg and beat just until the dough pulls together.

Transfer the dough to a work surface and gently pat into a ball. Lightly flatten into a disk shape. Roll our immediately or wrap in plastic wrap and chill for 1-2 hours.

When you’re ready to roll the dough, butter a 9-inch tart pan with removable bottom. Roll the chilled dough on work surface to form a 12 inch round. You’ll want to free the dough from the work surface occasionally to make sure it’s not sticking. You can also use a bit of flour on your roller and work surface to help with sticking.

Turn dough into prepared tart pan. Seal any cracks that you may have. Trim your overhang to about 1/2 an inch. Fold the overhang in to create double thick sides. Pierce crust all over with a fork. Freeze the crust for at least 30 minutes (I froze mine overnight) before baking.

You need to bake your crust before filling. Preheat oven to 375 degrees. Remove dough from freezer and cover with nonstick foil, shiny side down. Bake for 20-25 minutes. Remove foil and bake for an extra 10 minutes, or until golden brown.

Cool crust on wire rack to room temperature.

FOR THE LEMON CURD:
Whisk eggs, sugar and lemon juice in heavy small saucepan. Add butter and lemon peel. Stir over medium heat until curd thickens to pudding consistency, about 8 minutes. Transfer to small bowl. Press plastic wrap onto surface of curd and chill at least 2 hours.

TO ASSEMBLE THE TART
Spread curd in crust. Layer strawberries over curd.

Heat jam in a small saucepan or in a small bowl in microwave. If you microwave – BE CAREFUL! The jam gets hot VERY quickly (ask my husband about the second degree strawberry jam burn all over my hand – ouch). I recommend microwaving for 5 seconds at a time until it thins to desired consistency.

Brush jam over the top of strawberries and let glaze set in refrigerator for at least one hour or up to six hours. Release tart from pan and serve.

YIELD: 6-8 servings

Read Full Post »